Visualizzazione post con etichetta weblogic. Mostra tutti i post

mercoledì 23 gennaio 2013

JDeveloper: Deploy your project to an external WebLogic Server

JDeveloper by default uses it's internal WebLogic Server to deploy your projects.
When your project is completed presumably you will deploy your application to a production WebLogic Server.

In this post I explain how to create a deployment profile and deploy your project to an external WebLogic Server. I use the previously created SSXA webpage sample as reference but the procedure is the same for other applications like ADF ones.

First step is optional. I will change the default web context root name to a more easy one. By default JDev assigns web context root names like "You_App_Name-Project_Name-webapp" that will be used as root folder for project, this meas that the resulting url could be not so simple to remember.


To change this name right click your Project in Application Navigator -> Project Properties -> Java EE Application and modify values as you like.


So, let's start deploying our app.

Right click your app -> Deploy -> New Deployment Profile


Select Deployment Profile -> WAR File


Choose a name for your application and click OK twice on settings screens to use default settings.

Go to Application -> Deploy -> New Deployment Profile


Under Deployment Profile select EAR File


Under Application Assembly check your app then click OK


Click OK again to following screen to use default deployment settings.

Finally go to Application -> Deploy -> YOUR_DEPLOYMENT_NAME


Here you can choose between two deployment options:

1)Deploy to EAR file to be manually deployed to an external WebLogic Server

2)Configure an external WebLogic Server to allow JDeveloper to perform all tasks for you.

Option 2 is for sure the faster one just select Deploy to an Application Server and you will be prompted to configure an external WebLogic for deployments.


In this post though I will follow option 1 performing a manual deploy.

Select Deploy to EAR


Your EAR packaged application will be created somewhere on your hard drive, if you open Deployment tab in the bottom screen of JDev you will see a log containing where the file has been saved.

In my case my saving location is

C:\JDeveloper\mywork\Test_SSXA\deploy\application.ear

Login to your WebLogic Server that probably will have an URL similar to this:

http://weblogicserver_ip_address:7001/console

Click Deployments -> Lock & Edit -> Install


Click upload your file

In Deployment Archive select your EAR file then click Next


Click Next -> Next, then select the target you are deploying the application to: select AdminServer and click Next, choose a different name, if you like to, for your app then click Next -> Finish

Click Activate Changes


Return to Deployment page, select your application, click Start -> Service all requests


At this point your application will start servicing requests.

Go to:


http://weblogicserver_ip_address:7001/You_App_Name-Project_Name-webapp/appName/index.html

In my case:

http://10.0.0.4:7001/testSSXA/DemoSSXA/index.html


That's all!!

mercoledì 16 gennaio 2013

Oracle UCM: Site Studio for eXternal Applications (Part 1)


In a series of posts I would like to share some informations about Site Studio for eXternal Applications (SSXA).

As you probably know Oracle UCM provides the capability of delivering documents and related contents (images, videos, etc.) in web pages using dynamic elements such as WYSIWYG editors, dynamic conversion of Office documents into browser-viewable content, workflow approvals for contributions and so on.

This feature is managed in UCM by enabling Site Studio Component. (See NOTE at page bottom)

A further step is introduced by Site Studio for eXternal Applications that basically is a set of plugins enabled in JDeveloper which allow the separation of "web pages" and "content" leveraging WebLogic Server for serving web pages.

I explain myself better:

Site Studio uses Oracle UCM for serving both web pages (i.e. the structure of a page, like the layout of the page) and content (informations presented in web pages such as text/images/videos,etc.).


Site Studio for eXternal Applications uses WebLogic Server for serving web pages while contents are still stored in and delivered by Oracle UCM.


In this post I will explain the prerequisite configuration to start using SSXA. Since all webpages will be created using JDeveloper first you need to download it. I use version 1.1.1.5.0 due to SSXA plugin incopatibility with newer JDeveloper version. I can't confirm if newer versions of JDeveloper would work.

Install JDeveloper 1.1.5.0

Get JDeveloper libraries and copy them to your PC: 

oracle.ucm.ridc.jdev-11.1.1.zip

oracle.ucm.wcm.jdev-11.1.1.zip


They are located in your UCM server. Mine are located here:

/home/oracle/Oracle/Middleware/Oracle_ECM1/ucm/Distribution/RIDC/jdev/oracle.ucm.ridc.jdev-11.1.1.zip

/home/oracle/Oracle/Middleware/Oracle_ECM1/ucm/Distribution/SiteStudioExternalApplications/jdev/oracle.ucm.wcm.jdev-11.1.1.zip


Next step is to install libraries in JDeveloper:

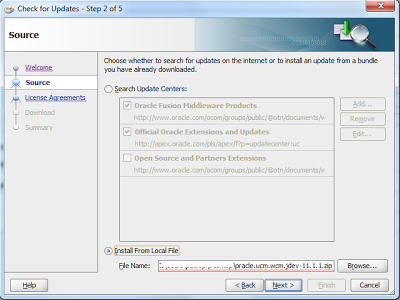
Open JDeveloper, click Help -> Check for Updates -> Source -> Install from Local File


Select oracle.ucm.ridc.jdev-11.1.1.zip first, restart JDeveloper, then install oracle.ucm.wcm.jdev-11.1.1.zip


JDeveloper is now configured to work with Site Studio.


In the following post I will explain how to leverage WebLogic server to host a website that includes document and assets from Oracle UCM.


NOTE: To enable Site Studio component login to your UCM as admin, click Admin Server


Click advanced component manager


Under Disabled Components enable all three Site Studio components


Restart UCM service

That's all!!

venerdì 14 dicembre 2012

Oracle UCM: Alter session timeout


Recently I was asked to increase user session duration preventing timeout after a brief idle time.

By default Oracle set duration of every session of 3600 seconds, which means that users inactive by more than 1 hour will need to re-authenticate to continue use Oracle UCM 11g.
To increase (or decrease) session timeout time you need to login to Enterprise Manager which in my case has this URL:

http://10.0.0.4:7001/em

In main screen select your UCM server


click "Oracle WebLogic Server Administration Console"


Login to WebLogic, click Deployments, expand Oracle Universal Content Management - Content Server and click "/"


Click Configuration, Lock & Edit button, set desired timeout session (in my case 10 hours) then click Save and Release Configuration. If WebLogic ask you to save a deployment plan click OK and wait for deployment to occur.


Now verify that this value correctly reflects on your UCM instance. Login to UCM and verify that session timeout was changed accordly to your settings.

That's all!!

mercoledì 8 agosto 2012

OBIEE: nQSError 43126 Invalid Username/Password

Today I experienced this trouble with OBIEE: users can't login to BI Presentation Services.

System returned the following error: An invalid User Name or Password was entered.

Although I was perfectly capable of accessing WebLogic Server console and Enterprise Manager console OBIEE didn't let me in.

After a brief investigation in logs located at:

BI_HOME/diagnostics/logs/OracleBIPresentationServicesComponent/coreapplication_obips1

I spotted this error:

WSM-06102 Policy Reference The policy reference URI "oracle/wss_username_token_service_policy" is not valid.

which is an error given by a deplyed component which has gone bad.

This can be verified accessing WebLogic Server Deployment console, wsm-pm component is in error state:


To solve this it's sufficient to re-deploy this component

Click Lock & Edit -> select component wsm-pm -> Update


Click Next -> Finish


Then Activate Changes and verify that wsm-pm can service all requests and is in running state.


Once this is completed you should be able to login to OBIEE presentation Services again!

martedì 24 luglio 2012

Oracle Middleware: How to autostart Middleware services with NodeManager

This post explains how to configure NodeManager in order to perform services autostart in case of failure or manually via WebLogic Server web interface.

In order to configure NodeManager we need to create a configuration file, so login to your Oracle Middleware/WebLogic machine:

[oracle@orcl /]$ cd /home/oracle/Oracle/Middleware/wlserver_10.3/common/nodemanager

[oracle@orcl nodemanager]$ nano nodemanager.properties

Copy/paste the following configuration, changing "ListenAddress" and "ListenPort" according to your server configuration.

DomainsFile=/home/oracle/Oracle/Middleware/wlserver_10.3/common/nodemanager/nodemanager.domains
LogLimit=0
PropertiesVersion=10.3
DomainsDirRemoteSharingEnabled=false
javaHome=/home/oracle/Oracle/Middleware/jrockit_160_24_D1.1.2-4
AuthenticationEnabled=false
NodeManagerHome=/home/oracle/Oracle/Middleware/wlserver_10.3/common/nodemanager
JavaHome=/home/oracle/Oracle/Middleware/jrockit_160_24_D1.1.2-4/jre
LogLevel=INFO
DomainsFileEnabled=true
StartScriptName=startWebLogic.sh
ListenAddress=10.0.0.84
NativeVersionEnabled=true
ListenPort=5556
LogToStderr=true
SecureListener=false
LogCount=1
DomainRegistrationEnabled=false
StopScriptEnabled=false
QuitEnabled=false
LogAppend=true
StateCheckInterval=500
CrashRecoveryEnabled=true
StartScriptEnabled=true
LogFile=/home/oracle/Oracle/Middleware/wlserver_10.3/common/nodemanager/nodemanager.log
LogFormatter=weblogic.nodemanager.server.LogFormatter
ListenBacklog=50

Once this is done you can start Nodemanager:

[oracle@orcl nodemanager]$ /home/oracle/Oracle/Middleware/wlserver_10.3/server/bin/startNodeManager.sh

Now we need to configure WebLogic in order to make him communicate with NodeManager:

http://YOUR_MIDDLEWARE_SERVER_IP:7001/console

Click Machines -> Lock & Edit button -> New


Select a Name for Machine, set Unix and click Next button


Set "Type PLAIN" as we will not use SSL, "Listen Address" the IP address of your WLS machine and "Listen Port" the one configured in nodemanager.properties. Click Finish button then Activate Changes.


Click on the Machine you just created, in my case "Machine-0" then Configuration tab, Servers tab, Add button


Select an existing server to associate with NodeManager, click Finish button and then Activate Changes button.


Move to Servers tab, Control tab, select server and you will be able to control it from there.


In case of service failure it will be automatically restarted as long as Nodemanager and WebLogic Server are running.

I suggest you to add an autostart script for WebLogic and NodeManager in order to make them start automatically on boot.

lunedì 23 luglio 2012

Oracle Middleware: Authentication against Active Directory


I've to admit that user login based on Active Directory credentials for me was a painful process. It took me some weeks to figure out how this works since every tutorial I step into was giving me different interpretations. I had to implement user login based on Active Directory for Oracle UCM so I googled for some guides: some say you need to implement AD authentication both on WebLogic server and on Oracle UCM creating an AD Provider. After trial and error I figured out that the correct method is to enable AD just on WebLogic Server, no Provider or whatsoever is needed on Middleware side.

Please note that since WebLogic server is the webserver on which most (if not all) Oracle Middleware runs Active Directory authentication explained in this post works not just for Oracle UCM but for, I suppose, every other Oracle Middleware. I've successfully applied this to Oracle Business Intelligence too.

So, let's start configuring WebLogic Server. Login to your WLS console that usually is located at:

http://YOUR_MIDDLEWARE_SERVER_IP:7001/console

Go to Security Realms -> myrealm -> Providers -> click on Lock & Edit to enable WLS configuration modifications -> click New


Choose a name for AD provider and in the dropdown menu choose "ActiveDirectoryAuthenticator"


Once provider has been created it's time to edit according to your AD settings.
First click on DefaultAuthenticator and be sure that Control Flag is set to SUFFICIENT


Then click on your newly created ActiveDirectory provider and set Control Flag to SUFFICIENT.


Login to your AD server, you need some informations before continue:


As you can see in the figure above I've all AD users in a folder called Users.Right click on this folder, properties and here you can see the User Base DN.

Return to WebLogic Server and on ProviderSpecific tab set:

HOST: YOUR_ACTIVE_DIRECTORY_SERVER_IP
PORT: AD_PORT
PRINCIPAL: CN=administrator,CN=Users,DC=yourdomain,DC=yourdc
CREDENTIAL: administrator password


USER BASE DN: CN=Users,DC=yourdomain,DC=yourdc
ALL USERS FILTER: (objectclass=user)
User Name Attribute: sAMAccountName
User Object Class: user
Use Retrieved User Name as Principal: CHECK


GROUP BASE DN: CN=Users,DC=yourdomain,DC=yourdc
ALL GROUPS FILTER: (objectclass=group)
Group From Name Filter: (&(cn=%g)(objectclass=group))
Group Search Scope: subtree
Group Membership Searching: unlimited
Max Group Membership Search Level: 0
Ignore Duplicate Membership: UNCHECK
Use Token Groups For Group Membership Lookup: UNCHECK


Static Group Name Attribute: cn
Static Group Object Class: group
Static Member DN Attribute: member
Static Group DNs from Member DN Filter: (&(member=%M)(objectclass=group))


Connection Pool Size: 6
Connect Timeout: 0
Parallel Connect Delay: 0
Results Time Limit: 0
Keep Alive Enabled: UNCHECK
Follow Referrals: CHECK
Bind Anonymously On Referrals: UNCHECK
Propagate Cause For Login Exception: CHECK
Cache Enabled: CHECK
Cache Size: 32
Cache TTL: 60
GUID Attribute: objectguid


Then press Save -> Release Configuration button and perform a WLS restart.

If everything went fine on WLS restart you should be able to login to your Middleware using AD credentials. If at this point you still can't login using AD please verify that your USER BASE DN and GROUP BASE DN are set correctly according to your AD settings.

That's all!!