Hello, it was a bit since my last post here. Meanwhile I had some weeks of vacation but ...when I came back here's an issue waiting for me: Oracle VM, production environment, guest VMs correctly working but VM Manager completely unable to discover server status (servers reported in stopped status with error) despite servers are running fine.
VM Manager was totally unusable, server discovery processes stucked, I had to manually abort these processes from VM Manager. After aborting these discovery processes VM Manager changed server statuses from "stopped with error" to "starting". If I performed a manually rediscovery of servers I got this error:
https://?uname?:?pwd?@10.0.0.8:8899/api/2 discover_hardware, Status: org.apache.xmlrpc.XmlRpcException: agent.utils.filelock.LockError:Lock file /var/run/ovs-agent/discover_hardware.lock failed: timeout occured.
Logged in to server via SSH and under /var/run/ovs-agent I got:
discover_hardware.lock
monitor.lock
So it became pretty clear this was an issue with ovs-agent which is the agent who performs communication between VM Server and VM Manager.
Please note that if you can afford to stop or move your VMs a server reboot could solve all this without messing with PIDs and services.
If you, like me, don't have such luck you need to deal with PIDs and services.
ovs-agent service is run by a script located at /etc/init.d/ovs-agent and it is registered as a service that can be invoked with:
service ovs-agent [stop | start | restart | status]
So I checked ovs-agent status:
[root@orclvmsrv1 ~]# service ovs-agent status
OVSHA (PID: 6763) is running...
OVSNotificationServer (PID: 6725) is running...
OVSStat (PID: 6767) is running...
OVSAgentServer (PID: 6771) is running...
OVSLogServer (PID: 6709) is running...
OVSMonitor (PID: 6759) is running...
OVSRemaster (PID: 6747) is running...
and all services were reported as running fine even if they actually are not.
My next step was to open a SR with Oracle, which involved sending a lot of logs, from both VM Server and VM Manager, to support engineers.
One of the requested logs was VM Server "lsof" which is the list of the current open files and a support engineer made me focus on this:
[root@orclvmsrv1 ~]# lsof | grep discover_hardware.lock
python 31309 root 6u REG 104,2 0 31704 /var/run/ovs-agent/discover_hardware.lock
which basically is the PID of the (python) process currently holding "discover_hardware".
This gave me the hint of killing processes involved with ovs-agent services.
So I got all PIDs involved:
[root@orclvmsrv1 ~]# service ovs-agent status
OVSHA (PID: 6763) is running...
OVSNotificationServer (PID: 6725) is running...
OVSStat (PID: 6767) is running...
OVSAgentServer (PID: 6771) is running...
OVSLogServer (PID: 6709) is running...
OVSMonitor (PID: 6759) is running...
OVSRemaster (PID: 6747) is running...
and then killed them:
[root@orclvmsrv1 ~]# kill 6763
[root@orclvmsrv1 ~]# kill 6725
[root@orclvmsrv1 ~]# kill 6767
[root@orclvmsrv1 ~]# kill 6771
[root@orclvmsrv1 ~]# kill 6709
[root@orclvmsrv1 ~]# kill 6759
[root@orclvmsrv1 ~]# kill 6747
and killed the process wich generated file lock seen above.
[root@orclvmsrv1 ~]# kill 31309
Checked status again:
[root@orclvmsrv1 ~]# service ovs-agent status
Procss OVSHA with PID 6763 doesn't exist.
Deleted .pid, .sock, .lock files under /var/run/ovs-agent
[root@orclvmsrv1 ~]# cd /var/run/ovs-agent
[root@orclvmsrv1 ~]# rm *.pid
[root@orclvmsrv1 ~]# rm *.sock
[root@orclvmsrv1 ~]# rm *.lock
Then started ovs-agent again and everything went back to work as usual:
[root@orclvmsrv1 ~]# service ovs-agent start
Starting ovs-agent services: [ OK ]
So, I'm still not able to understand why this happend and what caused this issue with ovs-agent but this was the method I followed to solve this problem.
One last note I would to add is that dealing with ovs-agent DO NOT affect guest VMs running on servers, they will be running fine even if ovs-agent is stopped, restarted, or whatsoever.
Suggestion: if you have more available servers in the pool, live migrate all guest VMs from affected server(s) to working ones and reboot affected servers.
That's all!!
Visualizzazione post con etichetta oracle vm. Mostra tutti i post
Visualizzazione post con etichetta oracle vm. Mostra tutti i post
giovedì 6 settembre 2012

lunedì 6 agosto 2012
Oracle VM: Some useful tips using XM command
This post states some obvious commands, which are well known by majority of sys admins using XEN hypervisors.
Anyway I whish to share these commands since I think they are pretty useful, infact I had to deal with command line when my VM Manager had troubles.
Let's start saying that XM commands are performed connecting to physical Oracle VM servers and should be used carefully since they are pretty powerful and could potentially destroy your VM environment just with a click.
A good practice is to deal with XM CLI only if VM Manager is unusable, since it's preferrable to execute tasks by VM Manager itself rather than by physical server, especially in an environment with more than one physical server because XM CLI commands could potentially lead to inconsistencies between physical servers.
Another thing to note before using XM CLI is that as stated by server itself: making manual modifications in the management domain might cause inconsistencies between Oracle VM Manager and the server.
XM provide a lot of functionalities and you can check them all by just typing:
[root@orclvmsrv1 ~]# xm
Oracle VM identifies guest VMs by assigning them an unique ID, despite the name you gave to VM during creation, so when you perform an action using XM CLI you need to refer to VMs using that ID instead of the VM name you gave.
I suggest when you create a new VM using VM Manager to take note of "VM Name - assigned ID" because it could be useful for future references.
If you didn't do that don't be worried, there's a solution anyway, you can see what's the VM name on vm.cfg file:
[root@orclvmsrv1 ~]# cd /OVS/Repositories/0004fb0000030000fc2ad4059c973859
[root@orclvmsrv1 0004fb0000030000fc2ad4059c973859]# ls
Assemblies ISOs lost+found Templates VirtualDisks VirtualMachines
As you can see above:
0004fb0000030000fc2ad4059c973859 is the REPOSITORY ID, every repository contains the following folders: Assemblies ISOs lost+found Templates VirtualDisks VirtualMachines
VM configuration files are placed in VirtualMachines folder.In this case I've 3 VMs in this Repository and these are VM's ID.
[root@orclvmsrv1 0004fb0000030000fc2ad4059c973859]# ls VirtualMachines/
0004fb00000600003ace83d53d5313b0 0004fb0000060000e0f49015b41ead02 0004fb00000600005d4bfe48c8fe0cf9
To check what's the name of a certain VM just have a look at vm.cfg file contained in every of the folders above.
[root@orclvmsrv1 VirtualMachines]# cat 0004fb0000060000e0f49015b41ead02/vm.cfg | grep OVM_simple_name
and search for OVM_simple_name attribute which tells you what's the name you assigned to that VM.
OVM_simple_name = 'VMM'
Now that you know how to identify VMs by theyr ID it's time to do some basic stuff:
1)List all running VMs:
[root@orclvmsrv1 ~]# xm list
Name ID Mem VCPUs State Time(s)
0004fb00000600003ace83d53d5313b0 1 4096 4 -b---- 9343.5
0004fb0000060000e0f49015b41ead02 8 4096 4 -b---- 832.9
Domain-0 0 726 12 r----- 14059.0
As you can see I've two running VMs in my domain.
2)Stop a running VM:
[root@orclvmsrv1 ~]# xm shutdown 0004fb00000600003ace83d53d5313b0
I gracefully stopped a guest VM
3)Kill a running VM:
Same thing as above, but instead of "shutdown" use "destroy"
[root@orclvmsrv1 ~]# xm destroy 0004fb00000600003ace83d53d5313b0
4) Start a (non running) VM:
If you have a VM that is not currently in running state and you wish to start it:
[root@orclvmsrv1 VirtualMachines]# xm create 0004fb00000600005d4bfe48c8fe0cf9/vm.cfg
Please note that in this case I was in VirtualMachines folder.You could need to use full path to vm.cfg file.
5) Live migrate running VM to another Oracle VM server in the same Pool:
This can be done in two ways, specifying destination server IP address or, as I suggest, just typing destination server name.This is useful if you have a lot of servers in your infrastructure, and remembering server names it's usually easier than IP addresses.
You need to add your servers names to host file:
[root@orclvmsrv1 ~]# vi /etc/hosts
Add all your servers:
10.0.0.103 orclvmserver2
10.0.0.104 orclvmserver3
10.0.0.105 orclvmserver4
Save file, then you can migrate your VM to orclvmserver2:
[root@orclvmsrv1 ~]# xm migrate -l 0004fb00000600005d4bfe48c8fe0cf9 orclvmserver2
In a future post I will explain the use of another great CLI: Oracle VM Manager 3 CLI
which was introduced since VM Manager 3.1.1 build 365 and performs almost any task of VM manager but via CLI instead of web interface.
That's all!!
Anyway I whish to share these commands since I think they are pretty useful, infact I had to deal with command line when my VM Manager had troubles.
Let's start saying that XM commands are performed connecting to physical Oracle VM servers and should be used carefully since they are pretty powerful and could potentially destroy your VM environment just with a click.
A good practice is to deal with XM CLI only if VM Manager is unusable, since it's preferrable to execute tasks by VM Manager itself rather than by physical server, especially in an environment with more than one physical server because XM CLI commands could potentially lead to inconsistencies between physical servers.
Another thing to note before using XM CLI is that as stated by server itself: making manual modifications in the management domain might cause inconsistencies between Oracle VM Manager and the server.
XM provide a lot of functionalities and you can check them all by just typing:
[root@orclvmsrv1 ~]# xm
Oracle VM identifies guest VMs by assigning them an unique ID, despite the name you gave to VM during creation, so when you perform an action using XM CLI you need to refer to VMs using that ID instead of the VM name you gave.
I suggest when you create a new VM using VM Manager to take note of "VM Name - assigned ID" because it could be useful for future references.
If you didn't do that don't be worried, there's a solution anyway, you can see what's the VM name on vm.cfg file:
[root@orclvmsrv1 ~]# cd /OVS/Repositories/0004fb0000030000fc2ad4059c973859
[root@orclvmsrv1 0004fb0000030000fc2ad4059c973859]# ls
Assemblies ISOs lost+found Templates VirtualDisks VirtualMachines
As you can see above:
0004fb0000030000fc2ad4059c973859 is the REPOSITORY ID, every repository contains the following folders: Assemblies ISOs lost+found Templates VirtualDisks VirtualMachines
VM configuration files are placed in VirtualMachines folder.In this case I've 3 VMs in this Repository and these are VM's ID.
[root@orclvmsrv1 0004fb0000030000fc2ad4059c973859]# ls VirtualMachines/
0004fb00000600003ace83d53d5313b0 0004fb0000060000e0f49015b41ead02 0004fb00000600005d4bfe48c8fe0cf9
To check what's the name of a certain VM just have a look at vm.cfg file contained in every of the folders above.
[root@orclvmsrv1 VirtualMachines]# cat 0004fb0000060000e0f49015b41ead02/vm.cfg | grep OVM_simple_name
and search for OVM_simple_name attribute which tells you what's the name you assigned to that VM.
OVM_simple_name = 'VMM'
Now that you know how to identify VMs by theyr ID it's time to do some basic stuff:
1)List all running VMs:
[root@orclvmsrv1 ~]# xm list
Name ID Mem VCPUs State Time(s)
0004fb00000600003ace83d53d5313b0 1 4096 4 -b---- 9343.5
0004fb0000060000e0f49015b41ead02 8 4096 4 -b---- 832.9
Domain-0 0 726 12 r----- 14059.0
As you can see I've two running VMs in my domain.
2)Stop a running VM:
[root@orclvmsrv1 ~]# xm shutdown 0004fb00000600003ace83d53d5313b0
I gracefully stopped a guest VM
3)Kill a running VM:
Same thing as above, but instead of "shutdown" use "destroy"
[root@orclvmsrv1 ~]# xm destroy 0004fb00000600003ace83d53d5313b0
4) Start a (non running) VM:
If you have a VM that is not currently in running state and you wish to start it:
[root@orclvmsrv1 VirtualMachines]# xm create 0004fb00000600005d4bfe48c8fe0cf9/vm.cfg
Please note that in this case I was in VirtualMachines folder.You could need to use full path to vm.cfg file.
5) Live migrate running VM to another Oracle VM server in the same Pool:
This can be done in two ways, specifying destination server IP address or, as I suggest, just typing destination server name.This is useful if you have a lot of servers in your infrastructure, and remembering server names it's usually easier than IP addresses.
You need to add your servers names to host file:
[root@orclvmsrv1 ~]# vi /etc/hosts
Add all your servers:
10.0.0.103 orclvmserver2
10.0.0.104 orclvmserver3
10.0.0.105 orclvmserver4
Save file, then you can migrate your VM to orclvmserver2:
[root@orclvmsrv1 ~]# xm migrate -l 0004fb00000600005d4bfe48c8fe0cf9 orclvmserver2
In a future post I will explain the use of another great CLI: Oracle VM Manager 3 CLI
which was introduced since VM Manager 3.1.1 build 365 and performs almost any task of VM manager but via CLI instead of web interface.
That's all!!
venerdì 3 agosto 2012
Oracle VM: Upgrade VM Manager to 3.1.1-399
A new patch for VM Manager is released by a few hours on MOS.
This patch as stated on changelog fixes the following issues:
14338549 - Fixes the issue where the log files do not have sufficient information to determine why TCPS fails to be enabled.
14318605 - Ensures that the upgrade process should not continue in case when the Oracle VM Manager cannot be stopped.
14256453 - Fixes the issue in server rediscovery due to the yum repository URL reset.
14222824 - Fixes the issue where iSCSI initiators were no longer associated with the ZFS Storage Appliance Access Groups after a restart of the Oracle VM Manager.
Login to My Oracle Support and download patch ID 14227416
Login to your VM Manager machine and
[root@vmm ~]# unzip p14227416_30_Linux-x86-64.zip
[root@vmm ~]# mount -o loop,ro ovmm-3.1.1-upgrade-b399.iso /mnt/cdrom/
[root@vmm ~]# cd /mnt/cdrom/
[root@vmm cdrom]# ./runUpgrader.sh
Stating OVM Manager upgrade on Thu Aug 2 10:06:59 CEST 2012
Oracle VM Manager 3.1.1.399 upgrade utility
Upgrade logfile : /tmp/upgrade-2012-08-02-06.log
It is highly recommended to do a full database repository backup prior to upgrading Oracle VM Manager ...
Press any key to continue ...
Oracle VM Manager is running ...
Verifying installation status ...
Read Oracle VM Manager config file ...
Skipping database upgrade for the same product version (3.1.1 to 3.1.1)
Found Oracle VM Manager install files ...
Found Oracle VM Manager upgrader ...
Found Oracle WebLogic Server ...
Found Java ...
Using the following information :
Database Host : 10.0.0.74
Database SID : ORCL
Database LSNR : 1521
Oracle VM Schema : ovs
Oracle VM Manager UUID : 0004fb0000010000aef89d7d546a0d5e
Current Build ID : 3.1.1.365
Upgrade from version : 3.1.1
Upgrade to version : 3.1.1
Using /tmp/workdir.OjEwPb3mDR for backup and export location.
Using /tmp/patchdir.bJf4OKPoG for patching.
Undeploying previous version of Oracle VM Manager application ...
Undeploying Oracle VM Manager help ...
Undeploying Oracle VM Manager console ...
Undeploying Oracle VM Manager core ...
Waiting for Oracle VM Manager core to fully undeploy...
Waiting...
Finished undeploying previous version ...
Upgrading Oracle VM Manager ...
Backing up old files to /tmp/ovm-manager-3-backup-2012-08-02-121118...
Removing old files ...
Unpacking Oracle VM Manager 3.1.1.399
Refresh system-jazn-data.xml file ...
Redeploying Oracle VM Manager core container ...
Redeploying Oracle VM Manager console ...
Redeploying Oracle VM Manager help ...
Unpacking Oracle VM Manager OVM CLI Tool
Completed upgrade to 3.1.1.399 ...
Writing updated config in /u01/app/oracle/ovm-manager-3/.config
Restart WebLogic ...
Stopping Oracle VM Manager [ OK ]
Starting Oracle VM Managernohup: ignoring input and redirecting stderr to stdout
[ OK ]
OVM Manager upgrade finished on Thu Aug 2 10:13:55 CEST 2012
Once installation is completed login to your VM Manager and everything should be back as normal and if you go to Help -> About you will see:
Oracle VM Manager
Version: 3.1.1.399
Build: 20120716_399
This patch as stated on changelog fixes the following issues:
14338549 - Fixes the issue where the log files do not have sufficient information to determine why TCPS fails to be enabled.
14318605 - Ensures that the upgrade process should not continue in case when the Oracle VM Manager cannot be stopped.
14256453 - Fixes the issue in server rediscovery due to the yum repository URL reset.
14222824 - Fixes the issue where iSCSI initiators were no longer associated with the ZFS Storage Appliance Access Groups after a restart of the Oracle VM Manager.
Login to My Oracle Support and download patch ID 14227416
Login to your VM Manager machine and
[root@vmm ~]# unzip p14227416_30_Linux-x86-64.zip
[root@vmm ~]# mount -o loop,ro ovmm-3.1.1-upgrade-b399.iso /mnt/cdrom/
[root@vmm ~]# cd /mnt/cdrom/
[root@vmm cdrom]# ./runUpgrader.sh
Stating OVM Manager upgrade on Thu Aug 2 10:06:59 CEST 2012
Oracle VM Manager 3.1.1.399 upgrade utility
Upgrade logfile : /tmp/upgrade-2012-08-02-06.log
It is highly recommended to do a full database repository backup prior to upgrading Oracle VM Manager ...
Press any key to continue ...
Oracle VM Manager is running ...
Verifying installation status ...
Read Oracle VM Manager config file ...
Skipping database upgrade for the same product version (3.1.1 to 3.1.1)
Found Oracle VM Manager install files ...
Found Oracle VM Manager upgrader ...
Found Oracle WebLogic Server ...
Found Java ...
Using the following information :
Database Host : 10.0.0.74
Database SID : ORCL
Database LSNR : 1521
Oracle VM Schema : ovs
Oracle VM Manager UUID : 0004fb0000010000aef89d7d546a0d5e
Current Build ID : 3.1.1.365
Upgrade from version : 3.1.1
Upgrade to version : 3.1.1
Using /tmp/workdir.OjEwPb3mDR for backup and export location.
Using /tmp/patchdir.bJf4OKPoG for patching.
Undeploying previous version of Oracle VM Manager application ...
Undeploying Oracle VM Manager help ...
Undeploying Oracle VM Manager console ...
Undeploying Oracle VM Manager core ...
Waiting for Oracle VM Manager core to fully undeploy...
Waiting...
Finished undeploying previous version ...
Upgrading Oracle VM Manager ...
Backing up old files to /tmp/ovm-manager-3-backup-2012-08-02-121118...
Removing old files ...
Unpacking Oracle VM Manager 3.1.1.399
Refresh system-jazn-data.xml file ...
Redeploying Oracle VM Manager core container ...
Redeploying Oracle VM Manager console ...
Redeploying Oracle VM Manager help ...
Unpacking Oracle VM Manager OVM CLI Tool
Completed upgrade to 3.1.1.399 ...
Writing updated config in /u01/app/oracle/ovm-manager-3/.config
Restart WebLogic ...
Stopping Oracle VM Manager [ OK ]
Starting Oracle VM Managernohup: ignoring input and redirecting stderr to stdout
[ OK ]
OVM Manager upgrade finished on Thu Aug 2 10:13:55 CEST 2012
Once installation is completed login to your VM Manager and everything should be back as normal and if you go to Help -> About you will see:
Oracle VM Manager
Version: 3.1.1.399
Build: 20120716_399
giovedì 2 agosto 2012
Oracle VM: Timeout starting OVMM service
I encountered this problem a while ago during a VM Manager restart: OVMM service didn't started anymore going in timeout.
As a general suggestion when this happens first thing to do is to have a look at VM Manager logs, located at:
/u01/app/oracle/ovm-manager-3/machine1/base_adf_domain/servers/AdminServer/logs/AdminServer.log
if file is too long to read you could just give a try grepping only errors
cat /u01/app/oracle/ovm-manager-3/machine1/base_adf_domain/servers/AdminServer/logs/AdminServer.log | grep ERROR
In this case however OVMM Timeout was caused by an issue in /etc/init.d/ovmm file and in detail by this line:
nohup su - oracle -c "$USER_MEM_ARGS DOMAIN_PRODUCTION_MODE=true JAVA_OPTIONS=\"-Djava.awt.headless=true -Xdebug -Xrunjdwp:transport=dt_socket,address=127.0.0.1:8453,server=y,suspend=n -da:org.apache.myfaces.trinidad\" /u01/app/oracle/ovm-manager-3/machine1/base_adf_domain/startWebLogic.sh &" > /dev/null
As you can see by default ovmm start script starts WebLogic server as oracle user, instead of root user, the one used to perform VM Manager installation.
I just fixed it by simply swapping oracle user with root user, this happened despite before VM Manager installation I launched "createOracle.sh" script which performs oracle user creation and permissions assignment.
So, to solve this issue simply replace:
nohup su - oracle -c "$USER_MEM_ARGS DOMAIN_PRODUCTION_MODE=true JAVA_OPTIONS=\"-Djava.awt.headless=true -Xdebug -Xrunjdwp:transport=dt_socket,address=127.0.0.1:8453,server=y,suspend=n -da:org.apache.myfaces.trinidad\" /u01/app/oracle/ovm-manager-3/machine1/base_adf_domain/startWebLogic.sh &" > /dev/null
with:
nohup su - root -c "$USER_MEM_ARGS DOMAIN_PRODUCTION_MODE=true JAVA_OPTIONS=\"-Djava.awt.headless=true -Xdebug -Xrunjdwp:transport=dt_socket,address=127.0.0.1:8453,server=y,suspend=n -da:org.apache.myfaces.trinidad\" /u01/app/oracle/ovm-manager-3/machine1/base_adf_domain/startWebLogic.sh &" > /dev/null
Then start ovmm service again:
service ovmm start
That's all!!
As a general suggestion when this happens first thing to do is to have a look at VM Manager logs, located at:
/u01/app/oracle/ovm-manager-3/machine1/base_adf_domain/servers/AdminServer/logs/AdminServer.log
if file is too long to read you could just give a try grepping only errors
cat /u01/app/oracle/ovm-manager-3/machine1/base_adf_domain/servers/AdminServer/logs/AdminServer.log | grep ERROR
In this case however OVMM Timeout was caused by an issue in /etc/init.d/ovmm file and in detail by this line:
nohup su - oracle -c "$USER_MEM_ARGS DOMAIN_PRODUCTION_MODE=true JAVA_OPTIONS=\"-Djava.awt.headless=true -Xdebug -Xrunjdwp:transport=dt_socket,address=127.0.0.1:8453,server=y,suspend=n -da:org.apache.myfaces.trinidad\" /u01/app/oracle/ovm-manager-3/machine1/base_adf_domain/startWebLogic.sh &" > /dev/null
As you can see by default ovmm start script starts WebLogic server as oracle user, instead of root user, the one used to perform VM Manager installation.
I just fixed it by simply swapping oracle user with root user, this happened despite before VM Manager installation I launched "createOracle.sh" script which performs oracle user creation and permissions assignment.
So, to solve this issue simply replace:
nohup su - oracle -c "$USER_MEM_ARGS DOMAIN_PRODUCTION_MODE=true JAVA_OPTIONS=\"-Djava.awt.headless=true -Xdebug -Xrunjdwp:transport=dt_socket,address=127.0.0.1:8453,server=y,suspend=n -da:org.apache.myfaces.trinidad\" /u01/app/oracle/ovm-manager-3/machine1/base_adf_domain/startWebLogic.sh &" > /dev/null
with:
nohup su - root -c "$USER_MEM_ARGS DOMAIN_PRODUCTION_MODE=true JAVA_OPTIONS=\"-Djava.awt.headless=true -Xdebug -Xrunjdwp:transport=dt_socket,address=127.0.0.1:8453,server=y,suspend=n -da:org.apache.myfaces.trinidad\" /u01/app/oracle/ovm-manager-3/machine1/base_adf_domain/startWebLogic.sh &" > /dev/null
Then start ovmm service again:
service ovmm start
That's all!!
mercoledì 25 luglio 2012
Oracle VM: Using OVM Utils
OVM Utils are a set of utilities created by Wim Coekaerts (for further informations please read Wim's blog) and released on MOS that allow users to perform using Command Line Interface almost every task that can be performed using VM Manager web interface.
Installation is really simple, just download from http://support.oracle.com
Patch 13602094: ORACLE VM 3.0 UTILS RELEASE 0.4
It's a 2.9MB zip that will be installed on the same machine where Oracle VM Manager resides.
Once downloaded extract p13602094_30_Linux-x86-64.zip to
/u01/app/oracle/ovm-manager-3/
[root@vmm ovm-manager-3]# unzip p13602094_30_Linux-x86-64.zip
[root@vmm ovm-manager-3]# unzip ovm_utils_0.5.2.zip
[root@vmm ovm-manager-3]# cd ovm_utils
OVM Utils are 6 different executables:
ovm_managercontrol: Performs actions at VM Manager level such as configuring yum repos and create cpu compatibility group. This features is intresting since using this tool allows you to group to a single server pool server with different CPU family group.
Actions allowed are: yuminfo, yumsetup, addkeystore, keystoreinfo, createcpugroup, removecpugroup, addservertocpugroup, removeserverfromcpugroup, listcpugroups, getsessiontimeout,setsessiontimeout
ovm_poolcontrol: Performs actions at Pool level. Actions allowed are: status, info, events, refresh, list, addserver, removeserver
ovm_repocontrol: Performs actions at Repository level. Actions allowed are: list, status, info, refresh, fixup, create
ovm_servercontrol: Performs actions at Server level. Actions allowed are: start, stop, restart, kill, mainton, maintoff, status, info, lock, upgrade, events, refresh, discover, list, listnfsexports, createnfsexport, deletenfsexport
ovm_vmcontrol: Performs actions at Virtual Machine level. Actions allowed are: start, stop, suspend, resume, status, restart, kill, info, lock, list, migrate, events, vcpuset, vcpuget, gettags, settags, fixcfg, delete
ovm_vmdisks: Query the Virtual Disks associated with a Virtual Machine.
ovm_vmmessage: Allows the user to send a message to a Virtual Machine in the form of a key/value pair or send a query to see if a message with a key was set inside the Virtual Machine.
These utilities have to be called passing some parameters:
./ovm_UTILITYNAME -u ADMIN_USERNAME -p ADMIN_PASSWORD -h VMMANAGER_HOSTNAME -c COMMAND_TO_SEND [-OPTIONAL_PARAMETERS]
For example here are some commands:
1)Perform a server rediscovery. My server IP Address is 10.0.0.102
./ovm_servercontrol -u admin -p password -h localhost -c discover -s 10.0.0.102 -P server_password
2)List all VMs in the Pool
./ovm_vmcontrol -u admin -p password -h localhost -c list
This command produced, in my case, the following output:
VM name : 'Win7'
uuid : '0004fb00000600003ace83d53d5313b0'
server : 'orclvmsrv1'
pool : 'CHP'
status : 'Stopped'
VM name : 'EnterpriseManager'
uuid : '0004fb00000600005d4bfe48c8fe0cf9'
server : 'orclvmsrv1'
pool : 'CHP'
status : 'Running'
VM name : 'VMM'
uuid : '0004fb0000060000e0f49015b41ead02'
server : 'orclvmsrv1'
pool : 'CHP'
status : 'Running'
3)Stop a running VM
./ovm_vmcontrol -u admin -p password -h localhost -c stop -v EnterpriseManager
If you need more informations about OVM Utils you can just read the manual located at
/u01/app/oracle/ovm-manager-3/ovm_utils/man/man8
That's all!!
Installation is really simple, just download from http://support.oracle.com
Patch 13602094: ORACLE VM 3.0 UTILS RELEASE 0.4
It's a 2.9MB zip that will be installed on the same machine where Oracle VM Manager resides.
Once downloaded extract p13602094_30_Linux-x86-64.zip to
/u01/app/oracle/ovm-manager-3/
[root@vmm ovm-manager-3]# unzip p13602094_30_Linux-x86-64.zip
[root@vmm ovm-manager-3]# unzip ovm_utils_0.5.2.zip
[root@vmm ovm-manager-3]# cd ovm_utils
OVM Utils are 6 different executables:
ovm_managercontrol: Performs actions at VM Manager level such as configuring yum repos and create cpu compatibility group. This features is intresting since using this tool allows you to group to a single server pool server with different CPU family group.
Actions allowed are: yuminfo, yumsetup, addkeystore, keystoreinfo, createcpugroup, removecpugroup, addservertocpugroup, removeserverfromcpugroup, listcpugroups, getsessiontimeout,setsessiontimeout
ovm_poolcontrol: Performs actions at Pool level. Actions allowed are: status, info, events, refresh, list, addserver, removeserver
ovm_repocontrol: Performs actions at Repository level. Actions allowed are: list, status, info, refresh, fixup, create
ovm_servercontrol: Performs actions at Server level. Actions allowed are: start, stop, restart, kill, mainton, maintoff, status, info, lock, upgrade, events, refresh, discover, list, listnfsexports, createnfsexport, deletenfsexport
ovm_vmcontrol: Performs actions at Virtual Machine level. Actions allowed are: start, stop, suspend, resume, status, restart, kill, info, lock, list, migrate, events, vcpuset, vcpuget, gettags, settags, fixcfg, delete
ovm_vmdisks: Query the Virtual Disks associated with a Virtual Machine.
ovm_vmmessage: Allows the user to send a message to a Virtual Machine in the form of a key/value pair or send a query to see if a message with a key was set inside the Virtual Machine.
These utilities have to be called passing some parameters:
./ovm_UTILITYNAME -u ADMIN_USERNAME -p ADMIN_PASSWORD -h VMMANAGER_HOSTNAME -c COMMAND_TO_SEND [-OPTIONAL_PARAMETERS]
For example here are some commands:
1)Perform a server rediscovery. My server IP Address is 10.0.0.102
./ovm_servercontrol -u admin -p password -h localhost -c discover -s 10.0.0.102 -P server_password
2)List all VMs in the Pool
./ovm_vmcontrol -u admin -p password -h localhost -c list
This command produced, in my case, the following output:
VM name : 'Win7'
uuid : '0004fb00000600003ace83d53d5313b0'
server : 'orclvmsrv1'
pool : 'CHP'
status : 'Stopped'
VM name : 'EnterpriseManager'
uuid : '0004fb00000600005d4bfe48c8fe0cf9'
server : 'orclvmsrv1'
pool : 'CHP'
status : 'Running'
VM name : 'VMM'
uuid : '0004fb0000060000e0f49015b41ead02'
server : 'orclvmsrv1'
pool : 'CHP'
status : 'Running'
3)Stop a running VM
./ovm_vmcontrol -u admin -p password -h localhost -c stop -v EnterpriseManager
If you need more informations about OVM Utils you can just read the manual located at
/u01/app/oracle/ovm-manager-3/ovm_utils/man/man8
That's all!!
venerdì 20 luglio 2012
Oracle VM: Upgrade VM Manager to 3.1.1-365
This post is related to a recent patch released by Oracle with improves and corrects some issues affecting VM Manager 3.1.1.
To apply this patch first you need to download it from MOS:
Download Patch 14227416
When downloaded burn .iso file to a cd and mount it to your VM Manager Linux
[root@vmm /]# mount /dev/cdrom /mnt/cdrom
[root@vmm /]# cd /mnt/cdrom
Or if you like you can mount the .iso directly
[root@vmm /]# mount -o loop ovmm-3.1.1-upgrade-b365.iso /mnt/cdrom
[root@vmm /]# cd /mnt/cdrom
Start installation process by simply running
[root@vmm /]# ./runUpgrader.sh
Please note that you should perform a full backup of VM Manager database in case something goes wrong during installation process.
Here is the output produced during patch apply:
Stating OVM Manager upgrade on Thu Jul 19 11:15:58 CEST 2012
Oracle VM Manager 3.1.1.365 upgrade utility
Upgrade logfile : /tmp/upgrade-2012-07-19-15.log
It is highly recommended to do a full database repository backup prior to upgrading Oracle VM Manager ...
Press any key to continue ...
Oracle VM Manager is running ...
Verifying installation status ...
Read Oracle VM Manager config file ...
Skipping database upgrade for the same product version (3.1.1 to 3.1.1)
Found Oracle VM Manager install files ...
Found Oracle VM Manager upgrader ...
Found Oracle WebLogic Server ...
Found Java ...
Using the following information :
Database Host : 10.0.0.74
Database SID : ORCL
Database LSNR : 1521
Oracle VM Schema : ovs
Oracle VM Manager UUID : 0004fb0000010000aef89d7d546a0d5e
Current Build ID : 3.1.1.305
Upgrade from version : 3.1.1
Upgrade to version : 3.1.1
Using /tmp/workdir.RnNTi2YzKa for backup and export location.
Using /tmp/patchdir.5j35ZzYWj for patching.
Undeploying previous version of Oracle VM Manager application ...
Undeploying Oracle VM Manager help ...
Undeploying Oracle VM Manager console ...
Undeploying Oracle VM Manager core ...
Waiting for Oracle VM Manager core to fully undeploy...
Waiting...
Finished undeploying previous version ...
Upgrading Oracle VM Manager ...
Backing up old files to /tmp/ovm-manager-3-backup-2012-07-19-111726...
Removing old files ...
Unpacking Oracle VM Manager 3.1.1.365
Refresh system-jazn-data.xml file ...
Redeploying Oracle VM Manager core container ...
Redeploying Oracle VM Manager console ...
Redeploying Oracle VM Manager help ...
Unpacking Oracle VM Manager OVM CLI Tool
Completed upgrade to 3.1.1.365 ...
Writing updated config in /u01/app/oracle/ovm-manager-3/.config
Restart WebLogic ...
Stopping Oracle VM Manager [ OK ]
Starting Oracle VM Managernohup: ignoring input and redirecting stderr to stdout
[ OK ]
OVM Manager upgrade finished on Thu Jul 19 11:18:57 CEST 2012
Once installation is completed login to your VM Manager and everything should be back as normal and if you go to Help -> About you will see:
Oracle VM Manager
Version: 3.1.1.365
Build: 20120615_365
That's all!!
To apply this patch first you need to download it from MOS:
Download Patch 14227416
When downloaded burn .iso file to a cd and mount it to your VM Manager Linux
[root@vmm /]# mount /dev/cdrom /mnt/cdrom
[root@vmm /]# cd /mnt/cdrom
Or if you like you can mount the .iso directly
[root@vmm /]# mount -o loop ovmm-3.1.1-upgrade-b365.iso /mnt/cdrom
[root@vmm /]# cd /mnt/cdrom
Start installation process by simply running
[root@vmm /]# ./runUpgrader.sh
Please note that you should perform a full backup of VM Manager database in case something goes wrong during installation process.
Here is the output produced during patch apply:
Stating OVM Manager upgrade on Thu Jul 19 11:15:58 CEST 2012
Oracle VM Manager 3.1.1.365 upgrade utility
Upgrade logfile : /tmp/upgrade-2012-07-19-15.log
It is highly recommended to do a full database repository backup prior to upgrading Oracle VM Manager ...
Press any key to continue ...
Oracle VM Manager is running ...
Verifying installation status ...
Read Oracle VM Manager config file ...
Skipping database upgrade for the same product version (3.1.1 to 3.1.1)
Found Oracle VM Manager install files ...
Found Oracle VM Manager upgrader ...
Found Oracle WebLogic Server ...
Found Java ...
Using the following information :
Database Host : 10.0.0.74
Database SID : ORCL
Database LSNR : 1521
Oracle VM Schema : ovs
Oracle VM Manager UUID : 0004fb0000010000aef89d7d546a0d5e
Current Build ID : 3.1.1.305
Upgrade from version : 3.1.1
Upgrade to version : 3.1.1
Using /tmp/workdir.RnNTi2YzKa for backup and export location.
Using /tmp/patchdir.5j35ZzYWj for patching.
Undeploying previous version of Oracle VM Manager application ...
Undeploying Oracle VM Manager help ...
Undeploying Oracle VM Manager console ...
Undeploying Oracle VM Manager core ...
Waiting for Oracle VM Manager core to fully undeploy...
Waiting...
Finished undeploying previous version ...
Upgrading Oracle VM Manager ...
Backing up old files to /tmp/ovm-manager-3-backup-2012-07-19-111726...
Removing old files ...
Unpacking Oracle VM Manager 3.1.1.365
Refresh system-jazn-data.xml file ...
Redeploying Oracle VM Manager core container ...
Redeploying Oracle VM Manager console ...
Redeploying Oracle VM Manager help ...
Unpacking Oracle VM Manager OVM CLI Tool
Completed upgrade to 3.1.1.365 ...
Writing updated config in /u01/app/oracle/ovm-manager-3/.config
Restart WebLogic ...
Stopping Oracle VM Manager [ OK ]
Starting Oracle VM Managernohup: ignoring input and redirecting stderr to stdout
[ OK ]
OVM Manager upgrade finished on Thu Jul 19 11:18:57 CEST 2012
Once installation is completed login to your VM Manager and everything should be back as normal and if you go to Help -> About you will see:
Oracle VM Manager
Version: 3.1.1.365
Build: 20120615_365
That's all!!
martedì 17 luglio 2012
Oracle VM: Reinstall VM Manager 3.1
Well, if you are used to play with Oracle VM you certainly have noticed that VM Manager is a pretty messy piece of software.
For sure it's the most vulnerable element in Oracle VM infrastructure.
It has some design uncertainties that allow users to perform some operations that shouldn't be allowed and viceversa doesen't allow users to performs other actions that should be allowed, usually because there are some untold prior actions to be taken.
So...for me was a pretty common task perform VM Manager reinstallations due to solve some malfunctioning affecting VM Manager.
Please note that servers are not affected by reinstalling VM Manager, if you have running VMs they will keep running during manager reinstall.
In this post I will prior perform an uninstall and then a reinstall of VM Manager 3.1 on the same machine.
At first you need the UUID of the previous VM Manager. This is an unique ID assigned during installation and it changes every time, so, if you are reinstalling VM manager you need to pass the already in use UUID to keep things running.
UUID can be seen in various places, Oracle suggest to retrieve it from VM Manager backupping this configuration file:
/u01/app/oracle/ovmmanager-3/.config
UUID can also be seen in VM Manager console under Help -> About
Let's start with VM Manager uninstall.
Stop OVMM service.
[root@vmm cdrom]# service ovmm stop
Uninstall VM Manager choosing option number 3
[root@vmm cdrom]# ./runInstaller.sh
Oracle VM Manager Release 3.1.1 Installer
Please select an installation type:
1: Demo
2: Production
3: Uninstall
4: Help
Select Number (1-4): 3
Uninstall Java
Uninstall Oracle VM 3.0 Manager
Uninstall Oracle WebLogic Server
It's now time to reinstall VM Manager. This is done passing previously saved UUID as a parameter. In this example my UUID is "0004fb0000010000aef89d7d546a0d5e" so you need to replace it according to yours.
[root@vmm cdrom]# ./runInstaller.sh --uuid 0004fb0000010000aef89d7d546a0d5e
Select option 2 and you will be prompted to insert usernames and password for DB schema, WebLogic, VM Manager console and so on...
Please note that if you will use the same database and instance of a previous installation there's no need to perform a database schema drop since the installer will drop it and recreate it for you.
Oracle VM Manager Release 3.1.1 Installer
Please select an installation type:
1: Demo
2: Production
3: Uninstall
4: Help
Select Number (1-4): 2
...installation will take some minutes.
Step 1 of 9 : Database ...
Step 2 of 9 : Java ..
Step 3 of 9 : Database Schema ...
Creating database schema 'ovs' ...
Step 4 of 9 : WebLogic ...
Step 5 of 9 : ADF ...
Step 6 of 9 : Oracle VM ...
Step 7 of 9 : Domain creation ...
Step 8 of 9 : Deploy ...
Step 9 of 9 : Oracle VM Manager Shell ...
After installation completion remove configuration file.
Please remove configuration file /tmp/ovm_configpXS2I9.
[root@vmm cdrom]# rm /tmp/ovm_configpXS2I9
Now login to OVM console.
http://VM_MANAGER_IP_ADDRESS:7001/ovm/console

Discover Servers

After servers are correctly discovered if there are warning signs on servers move to perspective Events -> Acknowledge All.

Under Networking tab all networks should have been correctly rediscovered.

In my case I have ISCSI storage so I need to rediscover all LUNs presented to servers. If you use NFS storage you need to rediscover it too, but if your using FCP storage there's no need to rescan since it will be presented under SAN Servers -> Unmanaged FibreChannel Storage Array.

If you are using ISCSI storage you need to reassign storage initiators. Click on your newly added storage, move to Perspective "Access Groups", edit the "Default Access Group", "Storage Initiators" tab and move iscsi initiators to the right.

Next step is to rediscover any existing repository. This is done clicking "Shared File Systems" and clicking Refresh button on every LUN with a repository on it.

After repository rediscovery if you move to "Repositories" tab you will see every existing repository but if you browse it you will see it's empty. This is because repos are not yet presented to any server.
To do this click on green arrows "Present-Unpresent Selected Repository" and move all servers to the right. Then refresh repository and all contents in repository will be correctly recognized.

Now move to "Servers and VMs" tab and "Virtual Machines" perspective. All VMs will be correctly recognized.

That's all!!
For sure it's the most vulnerable element in Oracle VM infrastructure.
It has some design uncertainties that allow users to perform some operations that shouldn't be allowed and viceversa doesen't allow users to performs other actions that should be allowed, usually because there are some untold prior actions to be taken.
So...for me was a pretty common task perform VM Manager reinstallations due to solve some malfunctioning affecting VM Manager.
In this post I will prior perform an uninstall and then a reinstall of VM Manager 3.1 on the same machine.
At first you need the UUID of the previous VM Manager. This is an unique ID assigned during installation and it changes every time, so, if you are reinstalling VM manager you need to pass the already in use UUID to keep things running.
UUID can be seen in various places, Oracle suggest to retrieve it from VM Manager backupping this configuration file:
/u01/app/oracle/ovmmanager-3/.config
UUID can also be seen in VM Manager console under Help -> About
Let's start with VM Manager uninstall.
Stop OVMM service.
[root@vmm cdrom]# service ovmm stop
Uninstall VM Manager choosing option number 3
[root@vmm cdrom]# ./runInstaller.sh
Oracle VM Manager Release 3.1.1 Installer
Please select an installation type:
1: Demo
2: Production
3: Uninstall
4: Help
Select Number (1-4): 3
Uninstall Java
Uninstall Oracle VM 3.0 Manager
Uninstall Oracle WebLogic Server
It's now time to reinstall VM Manager. This is done passing previously saved UUID as a parameter. In this example my UUID is "0004fb0000010000aef89d7d546a0d5e" so you need to replace it according to yours.
[root@vmm cdrom]# ./runInstaller.sh --uuid 0004fb0000010000aef89d7d546a0d5e
Select option 2 and you will be prompted to insert usernames and password for DB schema, WebLogic, VM Manager console and so on...
Please note that if you will use the same database and instance of a previous installation there's no need to perform a database schema drop since the installer will drop it and recreate it for you.
Oracle VM Manager Release 3.1.1 Installer
Please select an installation type:
1: Demo
2: Production
3: Uninstall
4: Help
Select Number (1-4): 2
...installation will take some minutes.
Step 1 of 9 : Database ...
Step 2 of 9 : Java ..
Step 3 of 9 : Database Schema ...
Creating database schema 'ovs' ...
Step 4 of 9 : WebLogic ...
Step 5 of 9 : ADF ...
Step 6 of 9 : Oracle VM ...
Step 7 of 9 : Domain creation ...
Step 8 of 9 : Deploy ...
Step 9 of 9 : Oracle VM Manager Shell ...
After installation completion remove configuration file.
Please remove configuration file /tmp/ovm_configpXS2I9.
[root@vmm cdrom]# rm /tmp/ovm_configpXS2I9
Now login to OVM console.
http://VM_MANAGER_IP_ADDRESS:7001/ovm/console

Discover Servers

After servers are correctly discovered if there are warning signs on servers move to perspective Events -> Acknowledge All.

Under Networking tab all networks should have been correctly rediscovered.

In my case I have ISCSI storage so I need to rediscover all LUNs presented to servers. If you use NFS storage you need to rediscover it too, but if your using FCP storage there's no need to rescan since it will be presented under SAN Servers -> Unmanaged FibreChannel Storage Array.

If you are using ISCSI storage you need to reassign storage initiators. Click on your newly added storage, move to Perspective "Access Groups", edit the "Default Access Group", "Storage Initiators" tab and move iscsi initiators to the right.

Next step is to rediscover any existing repository. This is done clicking "Shared File Systems" and clicking Refresh button on every LUN with a repository on it.

After repository rediscovery if you move to "Repositories" tab you will see every existing repository but if you browse it you will see it's empty. This is because repos are not yet presented to any server.
To do this click on green arrows "Present-Unpresent Selected Repository" and move all servers to the right. Then refresh repository and all contents in repository will be correctly recognized.

Now move to "Servers and VMs" tab and "Virtual Machines" perspective. All VMs will be correctly recognized.

That's all!!
martedì 3 luglio 2012
Error: Acquire running lock failed: 256
I recently encountered this problem on a guest VM running on OVM 3.1.1.
The Oracle VM Manager stated machine status as UNKNOWN so I could not start nor stop the VM giving me error while performing any operation on it.
Further investigation above task details returned this error:
Error: Acquire running lock failed: 256
I connected via SSH to one of Oracle VM servers and run the following command:
[root@orclvmsrv1 ~]# xm list
Name ID Mem VCPUs State Time(s)
0004fb00000600007fbdb52a1b566a74 15 4096 1 -b---- 229.6
Domain-0 0 726 12 r----- 62921.7
This command returns all VMs (referred by VM ID) and theyr corresponding state.
For further informations on xm command I suggest you to visit this page: xm man
To stop the guest VM run:
xm shutdown VIRTUAL_MACHINE_ID
In this case:
[root@orclvmsrv1 ~]# xm shutdown 0004fb00000600007fbdb52a1b566a74
The guest VM shutdowns and should be correctly recognized as "Stopped" by VM Manager.
This solved my issue and I was able to start again using VM Manager.
The Oracle VM Manager stated machine status as UNKNOWN so I could not start nor stop the VM giving me error while performing any operation on it.
Further investigation above task details returned this error:
Error: Acquire running lock failed: 256
I connected via SSH to one of Oracle VM servers and run the following command:
[root@orclvmsrv1 ~]# xm list
Name ID Mem VCPUs State Time(s)
0004fb00000600007fbdb52a1b566a74 15 4096 1 -b---- 229.6
Domain-0 0 726 12 r----- 62921.7
This command returns all VMs (referred by VM ID) and theyr corresponding state.
For further informations on xm command I suggest you to visit this page: xm man
To stop the guest VM run:
xm shutdown VIRTUAL_MACHINE_ID
In this case:
[root@orclvmsrv1 ~]# xm shutdown 0004fb00000600007fbdb52a1b566a74
The guest VM shutdowns and should be correctly recognized as "Stopped" by VM Manager.
This solved my issue and I was able to start again using VM Manager.
sabato 30 giugno 2012
Oracle VM Backup Running Guests VMs
In this post I provide a way to perform backup of running VMs for disaster recovery purpouse. Basically this procedure transfers VM Disks from production Repository to a different backup Repository placed on another SAN storage.
Please bear in mind that this backup does NOT guarantee data consistency so if your VMs runs apps such as DBs consider a backup strategy using utility tools such as rman.
In case you need to recover a VM you need first to delete the VM and corresponding disks from VM Manager then import backed up disk image and recreate the VM using imported disk image as virtual disk.

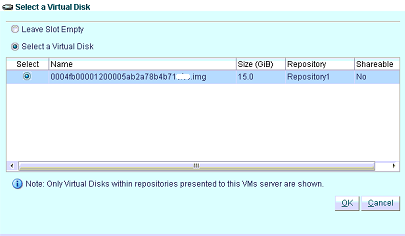
I use a dedicated Oracle Linux 6 U2 server to perform backups; it's basically a VM using a virtual disk mapped to a Repository created on an ISCSI separated storage.
Let's start step-by-step:
First I've created a dedicated Backup VM in VM Manager.
NOTE: Consider carefully the VirtualDisk size since in this machine you will store backup VirtualDisks. For example if you need to backup 5 VMs each one with a 20GB hard disk you need to have AT LEAST 20*5=100GB available disk space after system installation.
Second step is to install OS. I use Oracle Linux 6 U2 server.
Please refer to this guide to install oracle Linux: Oracle Linux installation & configuration guide
When OS is installed I created a dedicated user to perform backups:
[root@orcl ~]$ adduser VMBackup
Then I need to install two additional packages to allow backup script to be correctly executed:
[root@orcl ~]$ mkdir /mnt/cdrom
[root@orcl ~]$ mount /dev/cdrom /mnt/cdrom
[root@orcl ~]$ cd /mnt/cdrom/Packages
[root@orcl Packages]# rpm -Uvh tcl-8.5.7-6.el6.x86_64.rpm
[root@orcl Packages]# rpm -Uvh expect-5.44.1.15-2.el6.x86_64.rpm
Switch to VMBackup user:
[root@orcl ~]$ su - VMBackup
and create VMBackup.sh script
[VMBackup@orcl ~]$ nano /home/VMBackup/VMBackup.sh
NOTE: This code is inspired by "Automate SCP command using Shell Script" so credits for part of this script goes to Santhosh Kumar T.
Copy/Paste this code.
I know it's far from an elegant (and clean) code but it does the job so...
#!/bin/bash
##EDIT THIS VALUE
#Insert IP Address of your VM Server
YOUR_SERVER_IP_ADDRESS=10.0.0.12
##EDIT THIS VALUE
#Insert root password of your VM Server
YOUR_SERVER_PASSWORD=password
if [ $# -eq 0 ] ; then
echo 'Usage: VMBackup [backup | restore] [Repository ID] [VM VirtualDisk ID]'
exit 0
fi
case "$1" in
backup)
cat > /home/VMBackup/backup.sh <<EOF
#!/usr/bin/expect -f
spawn scp "root@$YOUR_SERVER_IP_ADDRESS:/OVS/Repositories/$2/VirtualDisks/$3.img" /home/VMBackup/$3.img
expect {
-re ".*es.*o.*" {
exp_send "yes\r"
exp_continue
}
-re ".*sword.*" {
exp_send "$YOUR_SERVER_PASSWORD\r"
}
}
interact
EOF
chmod a+x backup.sh
/home/VMBackup/backup.sh
rm /home/VMBackup/backup.sh
;;
restore)
cat > /home/VMBackup/restore.sh <<EOF
#!/usr/bin/expect -f
spawn scp /home/VMBackup/$3.img "root@$YOUR_SERVER_IP_ADDRESS:/OVS/Repositories/$2/VirtualDisks/$3.img"
expect {
-re ".*es.*o.*" {
exp_send "yes\r"
exp_continue
}
-re ".*sword.*" {
exp_send "$YOUR_SERVER_PASSWORD\r"
}
}
interact
EOF
chmod a+x restore.sh
/home/VMBackup/restore.sh
rm /home/VMBackup/restore.sh
;;
*) echo 'Usage: VMBackup [backup | restore] [Repository ID] [VM VirtualDisk ID]' ;;
esac
Then...
[VMBackup@orcl ~]$ chmod a+x /home/VMBackup/VMBackup.sh
and this is the command you use to perform a backup:
[VMBackup@orcl ~]$ /home/VMBackup/VMBackup.sh backup REPOSITORY_ID VIRTUAL_DISK_ID
or a restore:
[VMBackup@orcl ~]$ /home/VMBackup/VMBackup.sh restore REPOSITORY_ID VIRTUAL_DISK_ID
For example if your VirtualDisk location is:
/OVS/Repositories/0004fb0000030000ad1f4d7286b3abcd/VirtualDisks/0004fb00001200005ab2a78b4b71abcd.img
REPOSITORY_ID=0004fb0000030000ad1f4d7286b3abcd
VIRTUAL_DISK_ID=0004fb00001200005ab2a78b4b71abcd
the command to backup VirtualDisk 0004fb00001200005ab2a78b4b71abcd is
[VMBackup@orcl ~]$ /home/VMBackup/VMBackup.sh backup 0004fb0000030000ad1f4d7286b3abcd 0004fb00001200005ab2a78b4b71abcd
Reasonably you'll need to add this script to crontab so it will perform automated backups at certain time.
That's all!!
lunedì 25 giugno 2012
Oracle VM: Import VMs from Citrix
Today I was at a client's office and I was asked to convert some Guest VMs from Citrix to Oracle VM Infrastructure.
When importing in Oracle VM Manager the OVF (.ovf and .vhd) file exported using XenCenter it returned this error:
Assembly import error: encoding specified in XML declaration is incorrect
I manually imported VHD files to Oracle VM Manager then created a new VM using VHD as virtual disk but with no success. The guest VM was stucked at boot.
The same procedure above successfully completed using Oracle VM VirtualBox installed on my laptop...so here's the procedure I used to import VMs from Citrix to Oracle VM.
Basically this is a four step procedure:
1)Export OVF and VHD from Citrix XenCenter
2)Create a new VM in Oracle VM VirtualBox using as virtual disk the VHD disk exported above.
3)Export OVA from Oracle VM VirtualBox
4)Import OVA as an Assembly in Oracle VM Manager
Detailed procedure:
Export Citrix .ovf and .vhd from XenCenter

Open Oracle VM Virtualbox and deploy a new guest VM. As virtual hard disk select previously exported .vhd file(s).

Play virtual machine in Oracle VM Virtualbox and verify that it's booting correctly
Select File -> Export Appliance

Select vm to export NOT CHECK "Write old ovf 0.9" NOT CHECK "Write Manifest"
Export file.
The export result is an .ova file which contains the Citrix VM furtherly converted by Oracle VM VirtualBox.
Log-on to Oracle VM Manager then import new Assembly and select .ova file
When Assembly is imported click "Create VM Template".
Once Template is created guest VM can be deployed. Select "New VM" -> "Create from Template"
That's all!!
Iscriviti a:
Post (Atom)