Visualizzazione post con etichetta automation. Mostra tutti i post

giovedì 16 gennaio 2014

VMware: Automating virtual Standard Switch configuration using PowerCLI

After virtual Standard Switch Management with PowerCLI let's have a step further by creating a script to automate vSS configuration.
This script is intended for vSS configuration in a real-world scenario after a brand new install of ESXi in which we have the default single vSwitch0 with "Management Network" VMKernel and "VM Network" portgroup.


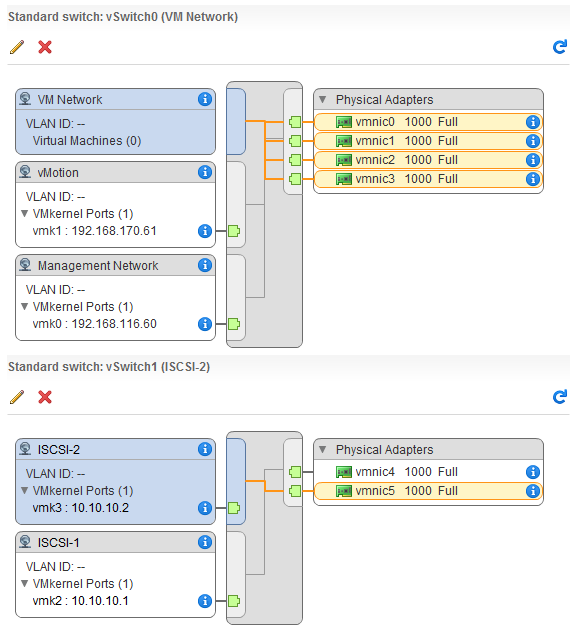
Script's goal is to automatically configure vSwitch0 and deploy an additional vSwitch1 for iSCSI traffic according to the following logical design:


Networking specifications are:

Six (6) physical NICs per host (vmnic0 through vmnic5).
Two (2) vSwitches one for Management + vMotion + VM Traffic, one for iSCSI Traffic.
One (1) vmnic dedicated for management, one (1) vmnic dedicated for vMotion, two (2) vmnics for VM Traffic using "Route based on the originating virtual port ID" load balancing. Two (2) vmnics dedicated for iSCSI Traffic with PortBinding enabled. VM Network portgroup has "MAC address changes" and "Forged transmits" set to reject according to VMware best practices.

Let's now delve into script, I've committed it also on my PowerCLI GitHub Repository.
First part of the script is where variables are declared, change them accordingly to your environment and desired configurations. Save is with ".ps1" format and run it.

 ################################  
 #                              #  
 # vSS Management with PowerCLI #  
 #                              #  
 ################################  
 $virtualswitch = "vSwitch0" #vSwitch  
 $virtualswitchiscsi = "vSwitch1" #vSwitch for iSCSI  
 $esxihostip = "192.168.116.60" #ESXi host IP Address  
 $vmotionip = "192.168.170.61" #vMotion VMkernel IP Address  
 $subnetmask = "255.255.255.0" #VMKernel subnet mask  
 $mtu = "9000" #MTU Size (Jumbo Frames for iSCSI VMKernels)  
 $vmnic = @("vmnic0","vmnic1","vmnic2","vmnic3","vmnic4","vmnic5") #Array of ESXi host's vmnics  
 $iscsi_ip = @("10.10.10.1","10.10.10.2") #IP Address to assign to iSCSI VMKernels  
 $iscsitargetip = "10.10.10.3" #iSCSI Target IP Address  
 #Get VMHost  
 $vmhost = Get-VMHost -Name $esxihostip  
 #Get ESXCLI  
 $esxcli = Get-EsxCli  
 #Add vmnic1,vmnic2,vmnic3 to vSwitch0  
 Get-VirtualSwitch -VMHost $vmhost -Name $virtualswitch | Add-VirtualSwitchPhysicalNetworkAdapter -VMHostPhysicalNic (Get-VMHostNetworkAdapter -Physical -Name $vmnic[1],$vmnic[2],$vmnic[3]) -Confirm:$false  
 #Management Network: active vmnic0, standby vmnic1, unused vmnic2 vmnic3  
 Get-VirtualPortGroup -VMHost $vmhost -Name "Management Network" | Get-NicTeamingPolicy | Set-NicTeamingPolicy -MakeNicActive $vmnic[0] -MakeNicStandby $vmnic[1] -MakeNicUnused $vmnic[2],$vmnic[3]  
 #Create vMotion VMKernel  
 New-VMHostNetworkAdapter -VMHost $vmhost -PortGroup vMotion -VirtualSwitch $virtualswitch -IP $vmotionip -SubnetMask $subnetmask -VMotionEnabled:$true  
 #vMotion VMKernel: active vmnic1, standby vmnic0, unused vmnic2 vmnic3  
 Get-VirtualPortGroup -VMHost $vmhost -Name vMotion | Get-NicTeamingPolicy | Set-NicTeamingPolicy -MakeNicActive $vmnic[1] -MakeNicStandby $vmnic[0] -MakeNicUnused $vmnic[2],$vmnic[3]  
 #Reject MAC Address Changes and Forged Transmits on VM Portgroup  
 #EsxCLI command synthax: network vswitch standard portgroup policy security set --allow-forged-transmits --allow-mac-change --allow-promiscuous --portgroup-name --use-vswitch  
 $esxcli.network.vswitch.standard.portgroup.policy.security.set($false, $false, $false, "VM Network", $false)  
 #Create ISCSI vSwitch  
 New-VirtualSwitch -VMHost $vmhost -Name $virtualswitchiscsi -Nic $vmnic[4],$vmnic[5] -Mtu $mtu  
 #Create ISCSI VMKernel  
 New-VMHostNetworkAdapter -VMHost $vmhost -PortGroup ISCSI-1 -VirtualSwitch $virtualswitchiscsi -IP $iscsi_ip[0] -SubnetMask $subnetmask -Mtu $mtu  
 New-VMHostNetworkAdapter -VMHost $vmhost -PortGroup ISCSI-2 -VirtualSwitch $virtualswitchiscsi -IP $iscsi_ip[1] -SubnetMask $subnetmask -Mtu $mtu  
 #Set ISCSI VMKernel  
 Get-VirtualPortGroup -VMHost $vmhost -Name ISCSI-1 | Get-NicTeamingPolicy | Set-NicTeamingPolicy -MakeNicActive $vmnic[4] -MakeNicUnused $vmnic[5]  
 Get-VirtualPortGroup -VMHost $vmhost -Name ISCSI-2 | Get-NicTeamingPolicy | Set-NicTeamingPolicy -MakeNicActive $vmnic[5] -MakeNicUnused $vmnic[4]  
 #Add iSCSI Software Adapter  
 Get-VMHostStorage -VMHost $vmhost | Set-VMHostStorage -SoftwareIScsiEnabled:$true  
 #ISCSI PortBinding  
 $portname = Get-VMHostNetworkAdapter | where {$_.PortGroupName -match "ISCSI-*"} | %{$_.DeviceName}  
 $vmhba = Get-VMHostHba -VMHost $vmhost -Type iscsi | %{$_.Device}  
 $esxcli.iscsi.networkportal.add($vmhba, $false, $portname[0]) #Bind vmk2  
 $esxcli.iscsi.networkportal.add($vmhba, $false, $portname[1]) #Bind vmk3  
 #ISCSI Target Dynamic Discovery  
 New-IScsiHbaTarget -IScsiHba $vmhba -Address $iscsitargetip  
 #Rescan VMFS & HBAs  
 $vmhost | Get-VMHostStorage -RescanVmfs -RescanAllHba  

As expected this will be the result:


As usual code is commented, but let me spend a few words on some particular cmdlets:

 $esxcli.network.vswitch.standard.portgroup.policy.security.set($false, $false, $false, "VM Network", $false)  

is an esxcli command to change security policies on port groups (MAC Address changes, Forged Transmits and Promiscuous Mode) since PowerCLI does allow editing these features only for virtual distributed switches (vDS) and/or vDS port groups via Set-VDSecurityPolicy cmdlet.


 $esxcli.iscsi.networkportal.add($vmhba, $false, $portname[0])  

is another esxcli command for iSCSI port binding.


 New-IScsiHbaTarget -IScsiHba $vmhba -Address $iscsitargetip  

is the cmdlet to provide dynamic iSCSI target discovery.


While...


 Get-VMHostStorage -RescanVmfs -RescanAllHba  

perform a rescan of HBAs and VMFS datastores.

That's all!!

lunedì 13 gennaio 2014

VMware: virtual Standard Switch management with PowerCLI

Virtual Standard Switch (vSS) management is simple, it can be done using vSphere Flex Client or classic vSphere C# Client. vSS management using PowerCLI is even simplier: deployment, removal and customization of vSS, VMKernels, VM PortGroups can be achieved within seconds.
A big advantage of using PowerCLI is that we can perform automatically vSS implementation/customization across multiple hosts without having to browse host by host using vSphere Client.

This is an introductory post in which I will explain the basics of vSS management, what PowerCLI cmdlet to use for each vSS related activity. I will soon come up with another article providing a PowerCLI script to automate vSS provisioning in a real case scenario.

As usual let's have a look at official PowerCLI Documentation first.

Let's begin: how to create a virtual standard switch? New-VirtualSwitch cmdlet is used, 192.168.116.60 in the example below is the IP address of the ESXi host on which I will add vSwitch1.

 New-VirtualSwitch -VMHost (Get-VMHost 192.168.116.60) -Name vSwitch1 -Nic vmnic1,vmnic2  

A new vSS vSwitch1 with no associated PortGroups will be created.


To create a VMKernel the New-VMHostNetworkAdapter cmdlet is used. Since a VMKernel can be associated to a specific traffic (Management, FaultTolerance, VSAN, vMotion) we need to specify what we will use this VMKernel for. In this example I will create a vMotion VMKernel for vSwitch1 and I will assign 192.168.116.61 IP Address to it and set MTU to 9000 bytes (JumboFrames). Please note that by default every VMKernel traffic binding is set to false so setting, for example, -ManagementTrafficEnabled:$false is  worthless.

 New-VMHostNetworkAdapter -VMHost (Get-VMHost -Name 192.168.116.60) -PortGroup vMotion -VirtualSwitch vSwitch1 -IP 192.168.116.61 -SubnetMask 255.255.255.0 -FaultToleranceLoggingEnabled:$false -ManagementTrafficEnabled:$false -VsanTrafficEnabled:$false -VMotionEnabled:$true -Mtu 9000  

A VMKernel for vMotion has just been created.


Next step is how to change VMKernel properties such as load balancing policy or active/standby/unused vmnics. This is done with Set-NicTeamingPolicy cmdlet.

In this example I set vMotion VMKernel load balancing policy to Route based on source MAC hash (not for a specific reason but just for article purpouses), mark vmnic1 as active and vmnic2 as standby.

 Get-VirtualPortGroup -VMHost (Get-VMHost -Name 192.168.116.60) -Name vMotion | Get-NicTeamingPolicy | Set-NicTeamingPolicy -LoadBalancingPolicy LoadBalanceSrcMac -MakeNicActive vmnic1 -MakeNicStandby vmnic2  

As expected changes will be reported in vSphere Web Client.


Let's now create a VM PortGroup using New-VirtualPortGroup cmdlet. To this PortGroup will be assigned VLAN ID 100.

 New-VirtualPortGroup -Name "VM Network 2" -VirtualSwitch vSwitch1 -VLanId 100  


As final step how to add a new vmnic to a vSwitch. AddVirtualSwitchPhysicalNetworkAdapter cmdlet is used.

 Get-VirtualSwitch -VMHost (Get-VMHost -Name 192.168.116.60) -Name vSwitch1 | AddVirtualSwitchPhysicalNetworkAdapter -VMHostPhysicalNic (Get-VMHostNetworkAdapter -Physical -Name vmnic3) -Confirm:$false  


Let's now reverse the process. Remove-VirtualSwitchPhysicalNetworkAdapter cmdlet is used to remove a vmnic from a vSwitch.

 Get-VMHost -Name 192.168.116.60 | Get-VMHostNetworkAdapter -Physical -Name vmnic3 | Remove-VirtualSwitchPhysicalNetworkAdapter -Confirm:$false  


Remove-VirtualPortGroup cmdlet is used to remove a VM PortGroup.

 Remove-VirtualPortGroup -VirtualPortGroup (Get-VirtualPortGroup -Name "VM Network 2") -Confirm:$false  


To remove a VMKernel without incurring in "Remove-VirtualPortGroup The resource '<VMKernel_Name>' is in use." error you have to remove the vmknic currently being used by VMKernel.

 Remove-VMHostNetworkAdapter -Nic (Get-VMHostNetworkAdapter -VMHost (Get-VMHost -Name 192.168.116.60) | where {$_.PortGroupName -eq "vMotion"}) -Confirm:$false  


VMKernel will be now recognized as a simple PortGroup that can be removed with Remove-VirtualPortGroup cmdlet:

 Remove-VirtualPortGroup -VirtualPortGroup (Get-VirtualPortGroup -Name vMotion) -Confirm:$false  


Finally to delete the entire vSwitch use Remove-VirtualSwitch cmdlet.

 Remove-VirtualSwitch -VirtualSwitch (Get-VirtualSwitch -VMHost 192.168.116.60 | where {$_.Name -eq "vSwitch1"}) -Confirm:$false  


That's all!!

mercoledì 8 gennaio 2014

VMware: vFRC Management with GUI PowerCLI

After Automating vFRC deployment with PowerCLI let's have a step further by creating a PowerCLI script that allow administrators to manage vFRC using a Graphical User Interface (GUI).

I created this PowerCLI GUI vFRC management tool as a sample that can be used as a starting point for developing your own GUIs. What's this tool for? It simply gives you the ability to change Cache Size and Block Size of a VM disk on a vFRC enabled host.

PowerCLI GUIs, even if it would be more appropriate saying PowerShell, are very similar to .NET ones. Features, capabilities and results are quite the same since they use the common framework Microsoft provides for building frames and controls such as buttons, textboxes, labels, comboboxes, etc.

Code it's quite commented itself, I divided the script in two macro-areas: the function area, where logic is done, and a "design area" where I essentially defined all elements composing the user interface, their size, their position, what action to trigger in case of user intervention, etc.

I think it is important to spend a few words on elements positioning into the form.

An element position can be defined in several ways. In this script I used both the "compact" and the "extended" synthax.

The extended way to define an element position is:

$Component.Left=10
$Component.Top=20
$Component.Right=30
$Component.Bottom=40


While the compact way:

$Component.Location = New-Object System.Drawing.Size(10,20,30,40)
Numeric values in code snippets above are distances, measured in pixels, that the defined component has from the border of the containing element.
Let's be more clear! If a button is contained in a form and this button has: New-Object System.Drawing.Size(10,20) this indicates that button is located 10px from the left border of the form and 20px from the upper border of the form.
The positioning is relative to the containing element though, because if the same button is contained in a GroupBox which itself is contained in a form, the above 10px from left border and 20px from upper border this time are referred to GroupBox borders and not to the form ones.

Let's now have a look on how vFRC GUI management tool works.

As usual for running PowerCLI script save the code with ".ps1" extension then run it from PowerCLI console.

Here's the code for vFRC GUI management tool, I've also pushed it to GitHub, you can find it here:

vFRC GUI on GitHub

 
##################BEGIN FUNCTIONS


function connectServer{

    try {

    $connect = Connect-VIServer -Server $serverTextBox.Text -User $usernameTextBox.Text -Password $passwordTextBox.Text

    $buttonConnect.Enabled = $false #Disable controls once connected
    $serverTextBox.Enabled = $false
    $usernameTextBox.Enabled = $false
    $passwordTextBox.Enabled = $false
    $buttonDisconnect.Enabled = $true #Enable Disconnect button

    getVmHosts #Populate DropDown list with all hosts connected (if vCenter)

    $HostDropDownBox.Enabled=$true
    
    
    $outputTextBox.text = "`nCurrently connected to $($serverTextBox.Text)" #If connection is successfull let user know it

    }

    catch {
    
    $outputTextBox.text = "`nSomething went wrong!!"
    
    }

}

function disconnectServer{

    try {

    $disconnect = Disconnect-VIServer -Confirm:$false -Force:$true

    $buttonConnect.Enabled = $true #Enable login controls once disconnected
    $serverTextBox.Enabled = $true
    $usernameTextBox.Enabled = $true
    $passwordTextBox.Enabled = $true
    $buttonDisconnect.Enabled = $false #Disable Disconnect button
    
    $HostDropDownBox.Items.Clear() #Remove all items from DropDown boxes
    $HostDropDownBox.Enabled=$false #Disable DropDown boxes since they are empty
    $VmDropDownBox.Items.Clear()
    $VmDropDownBox.Enabled=$false
    $HardDiskDropDownBox.Items.Clear()
    $HardDiskDropDownBox.Enabled=$false
    $cacheBlockSizeKBTextBox.Enabled=$false
    $cacheSizeGBTextBox.Enabled=$false
    
    $outputTextBox.text = "`nSuccessfully disconnected from $($serverTextBox.Text)" #If disconnection is successfull let user know it

    }

    catch {
    
    $outputTextBox.text = "`nSomething went wrong!!"
    
    }

}

function getPoweredOffVms{

    try {
    
    $poweredoffvms = Get-VM | Select-Object Name, VMHost, PowerState, Version | Where-Object {$_.PowerState -eq "PoweredOff" -and $_.Version -eq "v10" -and $_.VMHost -eq $(Get-VMHost | Where-Object {$_.Name -eq $HostDropDownBox.SelectedItem.ToString()})} #Returns only powered Off VMs that are hardware v10 (since older hw versions are not supported)

        foreach ($vm in $poweredoffvms) {
            $VmDropDownBox.Items.Add($vm.Name) #Add VMs to DropDown List
        }

    }

    catch {
    
    $outputTextBox.text = "`nSomething went wrong!!"
    
    }


}

function getVmHosts{

    try {

    $vmhosts = Get-VMHost | Where-Object {$_.PowerState -eq "PoweredOn" -and $_.ConnectionState -eq "Connected"} #Returns only powered On VmHosts

        foreach ($vm in $vmhosts) {
            $HostDropDownBox.Items.Add($vm.Name) #Add Hosts to DropDown List
        }    

    }

    catch {
    
    $outputTextBox.text = "`nSomething went wrong getting VMHosts!!"
    
    }

}

function getVmHostvFlashResource{

    try {
    
    $outputTextBox.text = "`nGetting vFRC configuration for VMHost: $($HostDropDownBox.SelectedItem.ToString())"
    
    $vFlashConfig = Get-VMHostVFlashConfiguration -VMHost $HostDropDownBox.SelectedItem.ToString()
    $capacityGbTextBox.text = $($vFlashConfig.CapacityGB)
    $swapCacheGbTextBox.text = $($vFlashConfig.SwapCacheReservationGB)
    $extentsTextBox.text = $($vFlashConfig.Extents)
    
    getPoweredOffVms #Populate DropDown list with all powered off VMs 

    $VmDropDownBox.Enabled=$true

    }

    catch {
    
    $outputTextBox.text = "`nSomething went wrong getting VMHostsvFlashResource!!"
    
    }

}

function getVmvFlashResource{

    try {
    
    $outputTextBox.text = "`nGetting vFRC configuration for VM: $($VmDropDownBox.SelectedItem.ToString())"
    
    $vFlashConfig = Get-HardDiskVFlashConfiguration -HardDisk $(Get-HardDisk -VM $VmDropDownBox.SelectedItem.ToString() -Name $HardDiskDropDownBox.SelectedItem.ToString())
        
    $cacheBlockSizeKBTextBox.text = $vFlashConfig.CacheBlockSizeKB
    
    $cacheSizeGBTextBox.text = $vFlashConfig.CacheSizeGB        
    
    $buttonSetvFrcVm.Enabled = $true #Enable vFRC related button/texbox
    $cacheBlockSizeKBTextBox.Enabled=$true
    $cacheSizeGBTextBox.Enabled=$true
    
    }

    catch {
    
    $outputTextBox.text = "`nSomething went wrong getting VMvFlashResource!!"
    
    }

}

function setVmvFlashResource{
    try{
    
    $cacheSizeGB = $cacheSizeGBTextBox.Text -as [int] #Convert values to integer
    $capacityGb = $capacityGbTextBox.Text -as [int]
    $swapCacheGb = $swapCacheGbTextBox.Text -as [int]
    
    
    if((($cacheBlockSizeKBTextBox.Text -eq 4) -or ($cacheBlockSizeKBTextBox.Text -eq 8) -or ($cacheBlockSizeKBTextBox.Text -eq 16) -or ($cacheBlockSizeKBTextBox.Text -eq 32) -or ($cacheBlockSizeKBTextBox.Text -eq 64) -or ($cacheBlockSizeKBTextBox.Text -eq 128) -or ($cacheBlockSizeKBTextBox.Text -eq 256) -or ($cacheBlockSizeKBTextBox.Text -eq 512) -or ($cacheBlockSizeKBTextBox.Text -eq 1024))){ #Control if CacheBlockSize value is allowed
 
        if($cacheSizeGB -le ($capacityGb - $swapCacheGb)){ #Control if enough resources are available
        
        Set-HardDiskVFlashConfiguration -VFlashConfiguration (Get-HardDiskVFlashConfiguration -HardDisk $(Get-HardDisk -VM $VmDropDownBox.SelectedItem.ToString() -Name $HardDiskDropDownBox.SelectedItem.ToString())) -CacheSizeGB $cacheSizeGBTextBox.Text -CacheBlockSizeKB $cacheBlockSizeKBTextBox.Text -Confirm:$false
        
        getVmvFlashResource #Display updated values
        
        $outputTextBox.text = "`nvFRC correctly set for VM $($VmDropDownBox.SelectedItem.ToString())"
        
        }
        
        else{
        
        $outputTextBox.text = "`nNot enough resources available!!"
        
        }
        
    }
    else{
    
    $outputTextBox.text = "`nvFRC -Block Size in KB- accepted values are: 4, 8, 16, 32, 64, 128, 256, 512, 1024"
    
    }    
    
    }
    catch{
    
    $outputTextBox.text = "`nSomething went wrong setting VMvFlashResource!!"
    
    }
}

function getDisks{

    try {
    
    $HardDiskDropDownBox.Items.Clear() #Remove all items from DropDown List since it may be dirtied by previous executions
    
    $harddisks = Get-HardDisk -VM $VmDropDownBox.SelectedItem.ToString()
    
        foreach ($disk in $harddisks) {
            $HardDiskDropDownBox.Items.Add($disk.Name) #Add Hosts to DropDown List
        }
        
    $HardDiskDropDownBox.Enabled = $true #Enable dropdownbox
        
    }
    catch{
       $outputTextBox.text = "`nSomething went wrong getting VmHardDisks!!"
    }
}

##################END FUNCTIONS

Import-Module VMware.VimAutomation.Extensions #Import VSAN & vFRC cmdlets

[void] [System.Reflection.Assembly]::LoadWithPartialName("System.Drawing") 
[void] [System.Reflection.Assembly]::LoadWithPartialName("System.Windows.Forms") 

##################Main Form Definition
    
    $main_form = New-Object System.Windows.Forms.Form 
    $main_form.Text = "vFRC GUI" #Form Title
    $main_form.Size = New-Object System.Drawing.Size(500,630) 
    $main_form.StartPosition = "CenterScreen"

    $main_form.KeyPreview = $True
    #$main_form.Add_KeyDown({if ($_.KeyCode -eq "Enter") 
    #{$x=$ServerTextBox.Text;$main_form.Close()}})
    $main_form.Add_KeyDown({if ($_.KeyCode -eq "Escape") 
    {$main_form.Close()}})

##################GroupBox Definition

    $groupBox1 = New-Object System.Windows.Forms.GroupBox
    $groupBox1.Location = New-Object System.Drawing.Size(10,5) 
    $groupBox1.size = New-Object System.Drawing.Size(190,200) #Width, Heigth
    $groupBox1.text = "Connect to vCenter or ESXi host:" 
    $main_form.Controls.Add($groupBox1) 

    $groupBox2 = New-Object System.Windows.Forms.GroupBox
    $groupBox2.Location = New-Object System.Drawing.Size(10,215) 
    $groupBox2.size = New-Object System.Drawing.Size(470,100) #Width, Heigth
    $groupBox2.text = "Hosts Operations:" 
    $main_form.Controls.Add($groupBox2) 

    $groupBox3 = New-Object System.Windows.Forms.GroupBox
    $groupBox3.Location = New-Object System.Drawing.Size(10,325) 
    $groupBox3.size = New-Object System.Drawing.Size(470,100) #Width, Heigth
    $groupBox3.text = "VMs Operations:" 
    $main_form.Controls.Add($groupBox3) 

    $groupBox4 = New-Object System.Windows.Forms.GroupBox
    $groupBox4.Location = New-Object System.Drawing.Size(10,435) 
    $groupBox4.size = New-Object System.Drawing.Size(470,150) #Width, Heigth
    $groupBox4.text = "Output:" 
    $main_form.Controls.Add($groupBox4)
    
    $groupBox5 = New-Object System.Windows.Forms.GroupBox
    $groupBox5.Location = New-Object System.Drawing.Size(210,5) 
    $groupBox5.size = New-Object System.Drawing.Size(270,200) #Width, Heigth
    $groupBox5.text = "Instructions:" 
    $main_form.Controls.Add($groupBox5)  

##################Label Definition

    $Label1 = New-Object System.Windows.Forms.Label
    $Label1.Location = New-Object System.Drawing.Point(10, 20)
    $Label1.Size = New-Object System.Drawing.Size(120, 14)
    $Label1.Text = “IP Address or FQDN:”
    $groupBox1.Controls.Add($Label1) #Member of GroupBox1

    $Label2 = New-Object System.Windows.Forms.Label
    $Label2.Location = New-Object System.Drawing.Point(10, 70)
    $Label2.Size = New-Object System.Drawing.Size(120, 14)
    $Label2.Text = "Username:”
    $groupBox1.Controls.Add($Label2) #Member of GroupBox1

    $Label3 = New-Object System.Windows.Forms.Label
    $Label3.Location = New-Object System.Drawing.Point(10, 120)
    $Label3.Size = New-Object System.Drawing.Size(120, 14)
    $Label3.Text = "Password:”
    $groupBox1.Controls.Add($Label3) #Member of GroupBox1
    
    $Label4 = New-Object System.Windows.Forms.Label
    $Label4.Location = New-Object System.Drawing.Point(10, 15)
    $Label4.Size = New-Object System.Drawing.Size(120, 14)
    $Label4.Text = “Select Host:”
    $groupBox2.Controls.Add($Label4) #Member of GroupBox2
    
    $Label5 = New-Object System.Windows.Forms.Label
    $Label5.Location = New-Object System.Drawing.Point(200, 55)
    $Label5.Size = New-Object System.Drawing.Size(90, 14)
    $Label5.Text = “Capacity in GB:”
    $groupBox2.Controls.Add($Label5) #Member of GroupBox2
    
    $Label6 = New-Object System.Windows.Forms.Label
    $Label6.Location = New-Object System.Drawing.Point(300, 55)
    $Label6.Size = New-Object System.Drawing.Size(160, 14)
    $Label6.Text = “Swap Cache reserved in GB:”
    $groupBox2.Controls.Add($Label6) #Member of GroupBox2
    
    $Label7 = New-Object System.Windows.Forms.Label
    $Label7.Location = New-Object System.Drawing.Point(10, 55)
    $Label7.Size = New-Object System.Drawing.Size(80, 14)
    $Label7.Text = “Extents:”
    $groupBox2.Controls.Add($Label7) #Member of GroupBox2
    
    $Label8 = New-Object System.Windows.Forms.Label
    $Label8.Location = New-Object System.Drawing.Point(10, 15)
    $Label8.Size = New-Object System.Drawing.Size(120, 14)
    $Label8.Text = “Select VM:”
    $groupBox3.Controls.Add($Label8) #Member of GroupBox3
    
    $Label9 = New-Object System.Windows.Forms.Label
    $Label9.Location = New-Object System.Drawing.Point(10, 55)
    $Label9.Size = New-Object System.Drawing.Size(90, 14)
    $Label9.Text = “Block Size in KB:”
    $groupBox3.Controls.Add($Label9) #Member of GroupBox3
    
    $Label10 = New-Object System.Windows.Forms.Label
    $Label10.Location = New-Object System.Drawing.Point(200, 55)
    $Label10.Size = New-Object System.Drawing.Size(160, 14)
    $Label10.Text = “Cache size in GB:”
    $groupBox3.Controls.Add($Label10) #Member of GroupBox3
    
    $Label11 = New-Object System.Windows.Forms.Label
    $Label11.Location = New-Object System.Drawing.Point(200, 15)
    $Label11.Size = New-Object System.Drawing.Size(80, 14)
    $Label11.Text = “Hard Disk:”
    $groupBox3.Controls.Add($Label11) #Member of GroupBox3
    
    $Label12 = New-Object System.Windows.Forms.Label
    $Label12.Location = New-Object System.Drawing.Point(10, 15)
    $Label12.Size = New-Object System.Drawing.Size(250, 180)
    $Label12.Text = “1)Connect to vCenter or ESXi host `r`n`r`n2)Select host and get vFRC configuration `r`n`r`n3)Select VM `r`n`r`n4)Select VM Hard Disk to which enable vFRC `r`n`r`n5)Change -Block Size- and -Cache Size- to desired values `r`n`r`n6)Apply changes pressing -Set vFRC- button `r`n`r`n`Developed by @HostileCoding”
    $groupBox5.Controls.Add($Label12) #Member of GroupBox3

##################Button Definition

    $buttonConnect = New-Object System.Windows.Forms.Button
    $buttonConnect.add_click({connectServer})
    $buttonConnect.Text = "Connect"
    $buttonConnect.Top=170
    $buttonConnect.Left=10
    $groupBox1.Controls.Add($buttonConnect) #Member of GroupBox1

    $buttonDisconnect = New-Object System.Windows.Forms.Button
    $buttonDisconnect.add_click({disconnectServer})
    $buttonDisconnect.Text = "Disconnect"
    $buttonDisconnect.Top=170
    $buttonDisconnect.Left=100
    $buttonDisconnect.Enabled = $false #Disabled by default
    $groupBox1.Controls.Add($buttonDisconnect) #Member of GroupBox1

    $buttonvFrcHost = New-Object System.Windows.Forms.Button
    $buttonvFrcHost.Size = New-Object System.Drawing.Size(260,25) 
    $buttonvFrcHost.add_click({getVmHostvFlashResource})
    $buttonvFrcHost.Text = "Get vFRC configuration for selected Host"
    $buttonvFrcHost.Left=200
    $buttonvFrcHost.Top=25
    $groupBox2.Controls.Add($buttonvFrcHost) #Member of GroupBox2
    
    $buttonGetvFrcVm = New-Object System.Windows.Forms.Button
    $buttonGetvFrcVm.Size = New-Object System.Drawing.Size(125,25) 
    $buttonGetvFrcVm.add_click({getVmvFlashResource})
    $buttonGetvFrcVm.Text = "Get VM vFRC"
    $buttonGetvFrcVm.Left=335
    $buttonGetvFrcVm.Top=25
    $buttonGetvFrcVm.Enabled = $false #Disabled by default
    $groupBox3.Controls.Add($buttonGetvFrcVm) #Member of GroupBox3
    
    $buttonSetvFrcVm = New-Object System.Windows.Forms.Button
    $buttonSetvFrcVm.Size = New-Object System.Drawing.Size(125,25) 
    $buttonSetvFrcVm.add_click({setVmvFlashResource})
    $buttonSetvFrcVm.Text = "Set VM vFRC"
    $buttonSetvFrcVm.Left=335
    $buttonSetvFrcVm.Top=65
    $buttonSetvFrcVm.Enabled = $false #Disabled by default
    $groupBox3.Controls.Add($buttonSetvFrcVm) #Member of GroupBox3

##################TextBox Definition

    $serverTextBox = New-Object System.Windows.Forms.TextBox 
    $serverTextBox.Location = New-Object System.Drawing.Size(10,40) #Left, Top, Right, Bottom
    $serverTextBox.Size = New-Object System.Drawing.Size(165,20) 
    $groupBox1.Controls.Add($serverTextBox) #Member of GroupBox1

    $usernameTextBox = New-Object System.Windows.Forms.TextBox 
    $usernameTextBox.Location = New-Object System.Drawing.Size(10,90)
    $usernameTextBox.Size = New-Object System.Drawing.Size(165,20) 
    $groupBox1.Controls.Add($usernameTextBox) #Member of GroupBox1

    $passwordTextBox = New-Object System.Windows.Forms.MaskedTextBox #Password TextBox
    $passwordTextBox.PasswordChar = '*'
    $passwordTextBox.Location = New-Object System.Drawing.Size(10,140)
    $passwordTextBox.Size = New-Object System.Drawing.Size(165,20)
    $groupBox1.Controls.Add($passwordTextBox) #Member of GroupBox1
    
    $capacityGbTextBox = New-Object System.Windows.Forms.TextBox
    $capacityGbTextBox.Location = New-Object System.Drawing.Size(200,70)
    $capacityGbTextBox.Size = New-Object System.Drawing.Size(90,20)
    $capacityGbTextBox.Enabled=$false 
    $groupBox2.Controls.Add($capacityGbTextBox) #Member of GroupBox2
    
    $swapCacheGbTextBox = New-Object System.Windows.Forms.TextBox
    $swapCacheGbTextBox.Location = New-Object System.Drawing.Size(300,70)
    $swapCacheGbTextBox.Size = New-Object System.Drawing.Size(160,20)
    $swapCacheGbTextBox.Enabled=$false 
    $groupBox2.Controls.Add($swapCacheGbTextBox) #Member of GroupBox2
    
    $extentsTextBox = New-Object System.Windows.Forms.TextBox
    $extentsTextBox.Location = New-Object System.Drawing.Size(10,70)
    $extentsTextBox.Size = New-Object System.Drawing.Size(180,20)
    $extentsTextBox.Enabled=$false 
    $groupBox2.Controls.Add($extentsTextBox) #Member of GroupBox2
    
    $cacheBlockSizeKBTextBox = New-Object System.Windows.Forms.TextBox
    $cacheBlockSizeKBTextBox.Location = New-Object System.Drawing.Size(10,70)
    $cacheBlockSizeKBTextBox.Size = New-Object System.Drawing.Size(90,20)
    $cacheBlockSizeKBTextBox.Enabled=$false 
    $groupBox3.Controls.Add($cacheBlockSizeKBTextBox) #Member of GroupBox3
    
    $cacheSizeGBTextBox = New-Object System.Windows.Forms.TextBox
    $cacheSizeGBTextBox.Location = New-Object System.Drawing.Size(200,70)
    $cacheSizeGBTextBox.Size = New-Object System.Drawing.Size(125,20)
    $cacheSizeGBTextBox.Enabled=$false 
    $groupBox3.Controls.Add($cacheSizeGBTextBox) #Member of GroupBox3

    $outputTextBox = New-Object System.Windows.Forms.TextBox 
    $outputTextBox.Location = New-Object System.Drawing.Size(10,20)
    $outputTextBox.Size = New-Object System.Drawing.Size(450,120)
    $outputTextBox.MultiLine = $True 
    $outputTextBox.ReadOnly = $True
    $outputTextBox.ScrollBars = "Vertical"  
    $groupBox4.Controls.Add($outputTextBox) #Member of groupBox4

##################DropDownBox Definition

    $VmDropDownBox = New-Object System.Windows.Forms.ComboBox
    $VmDropDownBox.DropDownStyle = [System.Windows.Forms.ComboBoxStyle]::DropDownList #Disable user input in ComboBox
    $VmDropDownBox.Location = New-Object System.Drawing.Size(10,30) 
    $VmDropDownBox.Size = New-Object System.Drawing.Size(180,20) 
    $VmDropDownBox.DropDownHeight = 200
    $VmDropDownBox.Enabled=$false 
    $groupBox3.Controls.Add($VmDropDownBox)
    
    $handler_VmDropDownBox_SelectedIndexChanged={ #DropDownBox SelectedIndexChanged Handler
        try{
            if ($VmDropDownBox.Text.Length -gt 0) {
               getDisks 
            }
        }catch{
        }
    }
    $VmDropDownBox.add_SelectedIndexChanged($handler_VmDropDownBox_SelectedIndexChanged)

    $HostDropDownBox = New-Object System.Windows.Forms.ComboBox
    $HostDropDownBox.DropDownStyle = [System.Windows.Forms.ComboBoxStyle]::DropDownList #Disable user input in ComboBox
    $HostDropDownBox.Location = New-Object System.Drawing.Size(10,30) 
    $HostDropDownBox.Size = New-Object System.Drawing.Size(180,20) 
    $HostDropDownBox.DropDownHeight = 200
    $HostDropDownBox.Enabled=$false 
    $groupBox2.Controls.Add($HostDropDownBox)
    
    $HardDiskDropDownBox = New-Object System.Windows.Forms.ComboBox
    $HardDiskDropDownBox.DropDownStyle = [System.Windows.Forms.ComboBoxStyle]::DropDownList #Disable user input in ComboBox
    $HardDiskDropDownBox.Location = New-Object System.Drawing.Size(200,30) 
    $HardDiskDropDownBox.Size = New-Object System.Drawing.Size(125,20) 
    $HardDiskDropDownBox.DropDownHeight = 200
    $HardDiskDropDownBox.Enabled=$false 
    $groupBox3.Controls.Add($HardDiskDropDownBox)
    
    $handler_HardDiskDropDownBox_SelectedIndexChanged={ #DropDownBox SelectedIndexChanged Handler
        try{
            if ($HardDiskDropDownBox.Text.Length -gt 0) {
               $buttonGetvFrcVm.Enabled = $true #Enable button
            }
        }catch{
        }
    }
    $HardDiskDropDownBox.add_SelectedIndexChanged($handler_HardDiskDropDownBox_SelectedIndexChanged)

##################Show Form

    $main_form.Add_Shown({$main_form.Activate()})
    [void] $main_form.ShowDialog()

Once you launch it main form will pop-out:


Enter credentials of your vCenter Server or ESXi host and connect to it. If connected to a vCenter Server all powered on hosts connected to vCenter itself will be added to dropdown box. Select a vFRC-capable host and click Get vFRC configuration for selected Host.


Any powered off virtual machine with hardware version 10 (ESXi 5.5 VMs) residing on selected host will be listed. Select intended VM and the VM's hard disk on which you need to enable or change vFRC settings.


Press Get VM vFRC button to retrieve current vFRC informations for selected VM. Here you can change both Block Size in KB and Cache Size in GB for selected hard disk.


Once done press Set VM vFRC to apply changes.


When setting vFRC the tool checks whether Block Size is permitted (either 4,8,16,32,64,128,256,512 or 1024 KB) and if enough Cache Size is available (i.e. you cannot assign more cache that the available one).

That's all!!

lunedì 23 dicembre 2013

VMware: Automating vFRC deployment with PowerCLI

After Increasing VM read performances using vFRC let's discuss about automating vFRC deployment in datacenter using PowerCLI.

A few weeks ago VMware released some brand new cmdlets for automating VSAN and vFRC using PowerCLI, so, after some testing, I decided to come up with a blog post regarding vFRC automation. What's about vFRC cmdlets? They are packed in an additional PowerCLI module that needs to be imported prior to be used. Once imported we are ready to go and as they say "sky is the limit".

At first you need to download cmdlets: Download VSAN & vFRC PowerCLI cmdlets.

As well explained in installation instructions place downloaded module in your reference folder, if you already don't have one create a new folder wherever you like. I used "C:\Users\paolop\Documents\WindowsPowerShell\Modules".

Then we need to add this new folder as an environment variable, so we can import modules from.

Here's the script that will do this for you. Copy these lines over to a text file, edit them accordingly to your environment and save it with .ps1 extension then run it from PowerCLI shell.

 $p = [Environment]::GetEnvironmentVariable("PSModulePath")  
 echo $p #Show your current path to modules  
 $p += ";C:\Users\<YOUR_USER>\Documents\WindowsPowerShell\Modules" #Add your custom location for modules  
 [Environment]::SetEnvironmentVariable("PSModulePath",$p)  

Once environment variable is set we need to import VSAN & vFRC module into PowerCLI shell:

Import-Module VMware.VimAutomation.Extensions

New cmdlets are now available:

Get-HardDiskVFlashConfiguration
Get-VMHostVFlashConfiguration
Get-VsanDisk
Get-VsanDiskGroup
New-VsanDisk
New-VsanDiskGroup
Remove-VsanDisk
Remove-VsanDiskGroup
Set-HardDiskVFlashConfiguration
Set-VMHostVFlashConfiguration

For article purpouse we only consider vFRC related cmdlets:

Get-Command -Module VMware.VimAutomation.Extensions | Format-List


 Name       : Get-HardDiskVFlashConfiguration  
 Definition    : Get-HardDiskVFlashConfiguration [[-HardDisk] <HardDisk[]>] [  
           -Server <VIServer[]>] [-Verbose] [-Debug] [-ErrorAction <Act  
           ionPreference>] [-WarningAction <ActionPreference>] [-ErrorV  
           ariable <String>] [-WarningVariable <String>] [-OutVariable  
           <String>] [-OutBuffer <Int32>]  
 Name       : Get-VMHostVFlashConfiguration  
 Definition    : Get-VMHostVFlashConfiguration [[-VMHost] <VMHost[]>] [-Serve  
           r <VIServer[]>] [-Verbose] [-Debug] [-ErrorAction <ActionPre  
           ference>] [-WarningAction <ActionPreference>] [-ErrorVariabl  
           e <String>] [-WarningVariable <String>] [-OutVariable <Strin  
           g>] [-OutBuffer <Int32>]  
 Name       : Set-HardDiskVFlashConfiguration  
 Definition    : Set-HardDiskVFlashConfiguration [-VFlashConfiguration] <Hard  
           DiskVFlashConfiguration[]> [-CacheSizeGB <Decimal>] [-CacheB  
           lockSizeKB <Int64>] [-Verbose] [-Debug] [-ErrorAction <Actio  
           nPreference>] [-WarningAction <ActionPreference>] [-ErrorVar  
           iable <String>] [-WarningVariable <String>] [-OutVariable <S  
           tring>] [-OutBuffer <Int32>] [-WhatIf] [-Confirm]  
 Name       : Set-VMHostVFlashConfiguration  
 Definition    : Set-VMHostVFlashConfiguration [-RemoveVFlashResource] [-VFla  
           shConfiguration <VMHostVFlashConfiguration[]>] [-SwapCacheRe  
           servationGB <Int64>] [-AddDevice <VMHostDisk[]>] [-AttachExi  
           stingVffs <String>] [-Server <VIServer[]>] [-Verbose] [-Debu  
           g] [-ErrorAction <ActionPreference>] [-WarningAction <Action  
           Preference>] [-ErrorVariable <String>] [-WarningVariable <St  
           ring>] [-OutVariable <String>] [-OutBuffer <Int32>] [-WhatIf  
           ] [-Confirm]  

Let's now delve more specifically into PowerCLI with an sample script that creates a new DC, enable flash pool resource on DC's hosts and create new virtual machines enabling vFRC on their disk.

To do this I've created 3 different scripts:

CreateDC.ps1: that creates a datacenter, a cluster with HA and DRS, and then dinamically adds hosts into DC by reading them from an input file containing host's IP or FQDN.

vFRC.ps1: adds server's local flash drives to vFRC pool.

CreateVMs.ps1: Deploy VMs from an existing template and reserve 1GB of their disk on vFRC pool.

At first we need to create a Settings.xml file used by PowerCLI scripts to read variables from. As you will notice from my code I will use variables coded in an XML file and read by PowerCLI scripts.

Edit this according to your environment.

 <?xml version="1.0" encoding="utf-8"?>  
 <Settings>  
 <vCenterIPorFQDN>10.0.0.127</vCenterIPorFQDN>  
 <vCenterUsername>Administrator@vsphere.local</vCenterUsername>  
 <vCenterPassword>vmware</vCenterPassword>  
 <DatacenterName>My Datacenter</DatacenterName>  
 <DatacenterFolder>Datacenter Folder</DatacenterFolder>  
 <ClusterName>My Cluster</ClusterName>  
 <HostUsername>root</HostUsername>  
 <HostPassword>mypassword</HostPassword>  
 <VmNumber>1</VmNumber>  
 <VmBaseName>vFRC_VM</VmBaseName>  
 <VmTemplate>Windows2k8Template</VmTemplate>  
 <VmDatastore>Datastore</VmDatastore>  
 <CacheSizeGB>1</CacheSizeGB>  
 </Settings>  

Variables name are quite self-explicative, although it may be useful to point out that:

HostUsername: username for hosts that will be added in the cluster. For sake of simplicity I assume all hosts have the same user/password.
HostPassword: password for hosts that will be added in the cluster. For sake of simplicity I assume all hosts have the same user/password.
VmNumber: is the number of VM to deploy from base template (Windows2k8Template in this example)
VmDatastore: datastore name where virtual machine will reside.
CacheSizeGB: how much GB of vFRC will be assigned to virtual machine disk.

Another configuration file required by script is hosts.txt which contains ESXi hosts IP addresses or FQDN.

My hosts.txt contains one host IP address only:

 10.0.0.126  

First PowerCLI script is CreateDC.ps1:

 [xml] $xmlconfigurations=get-content Settings.xml  
 Write-Host "Connecting to" $xmlconfigurations.Settings.vCenterIPorFQDN "vCenter" -foregroundcolor "magenta"  
 Connect-VIServer -Server $xmlconfigurations.Settings.vCenterIPorFQDN -User $xmlconfigurations.Settings.vCenterUsername -Password $xmlconfigurations.Settings.vCenterPassword  
 Write-Host "Creating" $xmlconfigurations.Settings.DatacenterFolder "Folder" -foregroundcolor "magenta"  
 Get-Folder -NoRecursion | New-Folder -Name $xmlconfigurations.Settings.DatacenterFolder  
 Write-Host "Creating" $xmlconfigurations.Settings.DatacenterName "Datacenter and" $xmlconfigurations.Settings.ClusterName "Cluster" -foregroundcolor "magenta"  
 New-Cluster -Location (  
 New-Datacenter -Location $xmlconfigurations.Settings.DatacenterFolder -Name $xmlconfigurations.Settings.DatacenterName  
 ) -Name $xmlconfigurations.Settings.ClusterName -HAEnabled -HAAdmissionControlEnabled:$false -DRSEnabled -DrsAutomationLevel FullyAutomated  
 Get-Content hosts.txt | Foreach-Object { #Read hosts in hosts.txt   
 Write-Host "Adding" $_ "to" $xmlconfigurations.Settings.ClusterName "Cluster" -foregroundcolor "magenta"  
 Add-VMHost $_ -Location $xmlconfigurations.Settings.ClusterName -User $xmlconfigurations.Settings.HostUsername -Password $xmlconfigurations.Settings.HostPassword -RunAsync -force:$true  
 }  

As stated above it will create a new datacenter, a cluster, and will add hosts to it. Nothing particular here, no "new" cmdlets are used here. I provide this code as an example for reading variables from an XML and TXT file. As most of you already have a datacenter properly setup you can safely skip this script and move to next which will bring in vFRC cmdlets.


vFRC.ps1 will create a new vFRC pool by using host local unused SSD diks.

 Write-Host "Importing PowerCLI vFRC cmdlets" -foregroundcolor "magenta"  
 Import-Module VMware.VimAutomation.Extensions #Import module  
 Get-Content hosts.txt | Foreach-Object { #Read hosts in hosts.txt   
 Write-Host "Getting current vFRC configuration for" $_ "host" -foregroundcolor "magenta"  
 $vFlashConfig = Get-VMHostVFlashConfiguration -VMHost $_  
 echo $vFlashConfig  
 Write-Host "Getting" $_ "host SSDs to be used by vFRC" -foregroundcolor "magenta"  
 $vFlashDisk = Get-VMHostDisk -VMHost $_  
 echo $vFlashDisk  
 Set-VMHostVFlashConfiguration -VFlashConfiguration $vFlashConfig -AddDevice $vFlashDisk #Enable vFRC on selected host   
 }  

This is done by using Set-VMHostVFlashConfiguration cmdlet.

Set-VMHostVFlashConfiguration -VFlashConfiguration $vFlashConfig -AddDevice $vFlashDisk


Last script is CreateVMs.ps1 that deploys VMs from a base template, reserve an amount of their disk space in vFRC pool and then place them on a host (DRS will place VM to right host according to resource availability). Host IP address is statically defined in the following script but can be easily read from an external file as explained in scripts above.

 [xml] $xmlconfigurations=get-content Settings.xml  
 Write-Host "Creating" $xmlconfigurations.Settings.NumberOfVM "VMs" -foregroundcolor "magenta"  
 $vmname = $xmlconfigurations.Settings.VmBaseName  
 1..$xmlconfigurations.Settings.NumberOfVM | Foreach {  #Creates VMs on 10.0.0.126 host
 New-VM -VMHost 10.0.0.126 -Name $vmname$_ -Template $xmlconfigurations.Settings.VmTemplate -Datastore $xmlconfigurations.Settings.VmDatastore  
 }  
 Import-Module VMware.VimAutomation.Extensions #Import module  
 Write-Host "Enabling vFRC on" $xmlconfigurations.Settings.VmNumber "VMs" -foregroundcolor "magenta"  
 1..$xmlconfigurations.Settings.NumberOfVM | Foreach {  
 Set-HardDiskVFlashConfiguration -VFlashConfiguration (Get-HardDiskVFlashConfiguration -HardDisk (Get-HardDisk -VM $vmname$_)) -CacheSizeGB $xmlconfigurations.Settings.CacheSizeGB -Confirm:$false  
 }  

vFRC cmdlet used here is:

Set-HardDiskVFlashConfiguration

which enable vFRC on a given virtual machine disk.


Thats' all!!

venerdì 20 dicembre 2013

VMware: ESXi Unattended Scripted Installation

ESXi installation is an easy job for one or two hosts, but imagine to repeat such installation for 40/50 hosts: it would take all day. To prevent such time-consuming situation VMware allow administrators to perform unattended ESXi installation.

Unattended installation is performed using a kickstart script that will be provided during boot. Kickstart script contains all parameters needed by ESXi to automatically complete installation process without further human intervention.

At first I suggest you to have a look at official documentation regarding ESXi 5.5 scripted installation:

Deploying ESXi 5.x using the Scripted Install feature (2004582)
About Installation and Upgrade Scripts

Here's my kickstart file. I named it ks.cfg. You can use it as a base template and edit it according to your requirements.

 #  
 # Sample scripted installation file  
 #  
 # Accept EULA  
 vmaccepteula  
 # Set root password  
 rootpw mypassword  
 #Install on local disk overwriting any existing VMFS datastore  
 install --firstdisk --overwritevmfs  
 # Network configuration  
 network --bootproto=static --device=vmnic0 --ip=192.168.116.228 --netmask=255.255.255.0 --gateway=192.168.116.2 --nameserver=192.168.116.2 --hostname=esx1.testdomain.local --vlanid=100 --addvmportgroup=1  
 #Reboot after installation completed  
 reboot  

As you can see the code is already commented but let me spend a few words on:

install --firstdisk --overwritevmfs

This is used to install ESXi on first available local disk overwriting any existent VMFS partition.

While:

network --bootproto=static --device=vmnic0 --ip=192.168.116.228 --netmask=255.255.255.0 --gateway=192.168.116.2 --nameserver=192.168.116.2 --hostname=esx1.testdomain.local --vlanid=100 --addvmportgroup=1

Specifies that vmnic0 will be used for management and assigns to it IP address, netmask, gateway and vlan id.

--addvmportgroup=1 creates the VM Network portgroup to which virtual machines will be connected by default.

Let me now explain how to use this kickstart file during installation.

Boot your host with ESXi installation media attached (I use CDROM). During boot press SHIFT + O to Edit boot options. Weasel prompt will appear.

> runweasel

Basic command to use a network accessible (HTTP, HTTPS, NFS, FTP) kickstart file is:

> runweasel ks=<kickstart_file_location> ip=<ip_address_to_use_to_retrieve_ks> netmask=<netmask_to_use_to_retrieve_ks> gateway=<gateway_to_use_to_retrieve_ks> vlanid=<vlan_to_use_to_retrieve_ks>

kickstart script s location can be not just an HTTP(S) server. Even FTP, NFS, cdrom or usb are accepted in the form of:

ks=protocol://<serverpath>
ks=cdrom:/<path\>
ks=file://<path>
ks=usb:</path>


In this example I retrieve kickstart file from a webserver (an HTTP location) and assign 192.168.116.222 as IP address for host during installation process.

> runweasel ks=http://192.168.116.1:8080/ks.cfg ip=192.168.116.222 netmask=255.255.255.0 gateway=192.168.116.2


Unattended installation will begin by parsing kickstart file.


When installation is completed host will reboot and ESXi will be ready to be used.


That's all!!

martedì 6 agosto 2013

VMware: Locate VMs snapshots using PowerCLI

Here's another PowerCLI post.
Everyone who is dealing with vSphere knows about snapshots pros and cons. To be honest I've had in the past some issues with snapshots, typically when visiting customers datacenters I found out VMs that were running on snapshots so old that they were bigger in size than base vmdk itself or, as once happened, that a backup software created almost 200 snapshots of a VM because, once backup was performed successfully, it was not able to revert back the snapshot.

That's why a common suggestion is to use snapshots just for updating purpouses like OS patching and revert them as soon as possible because as they grow up in size it could be unconfortable to revert them back.

After this introduction here's the main topic of this post: a PowerCLI script that locates snapshots of your VMs.

Save this code as a file with .ps1 extension:

 foreach($vm in ($VMs = Get-VM)){  
 $vm | Get-HardDisk | %{  
   if($_.Filename -like "*-??????.vmdk" -and ($_.Filename -match "\d{2,7}" -eq "True")){  
     $_.Filename |Ft -autosize | out-string -width 4096  
   }  
  }  
 }  


From code above you can see we are retrieving all VMs in our environment, then the hard disk files of that VMs.
Of these hard disks we want to display snapshots only.

As you know VMware snapshots disk are named:

<VM_NAME>-<SNAPSHOT_NUMBER>.vmdk
Example: Win2008-000001.vmdk


So with:

$_.Filename -like "*-??????.vmdk"
we are looking for disks that contains -<SNAPSHOT_NUMBER>.vmdk and with

$_.Filename -match "\d{2,7}" -eq "True"
we are verifying that those esclamation marks *-??????.vmdk are numbers and NOT letters.

Without this control the PowerCLI script would return any vmdk which has a "-" and 6 letters before ".vmdk"

For example it would also return a VM disk named:

Win2008-DVLPMT.vmdk

which clearly is NOT a snapshot disk.

As always to run this script you need to connect to a vCenter server (or ESXi host) by using Connect-VIServer cmdlet.


That's all!!

mercoledì 31 luglio 2013

VMware: Deploy VMs from Template using PowerCLI

After yesterday's introductive post, today I would like to share a simple, yet powerful, PowerCLI script that allows you to deploy VMs from a Template.

This is the script structure:

 1..<N> | Foreach {  
 New-VM -vmhost <ESX_HOST> -Name <VM_NAME> -Template <TEMPLATE> -Datastore <DATASTORE> [-OtherOptions]  
 }  

Where:

<N> is the number of VMs you need to deploy.
<ESX_HOST> is the host where you will deploy your VMs
<TEMPLATE> is the template from which your VMs will be created
<DATASTORE> is the datastore that will contain your VMs
[-OtherOptions] are additional options that can be used in conjunction with New-VM command.

As you can see it's really basic, but New-VM cmdlet is really powerful and it has a lot of options. To go through all on New-VM options:


Get-Help New-VM -Detailed


Here's how I used it today for deploying 6 VMs that will be Oracle RAC nodes.


Open a text editor and paste this code in it saving file with .ps1 extension.

 1..2 | Foreach {  
 New-VM -vmhost esx1.testdomain.com -Name RAC$_ -Template OL6 -Datastore datastore1  
 }  
 3..4 | Foreach {  
 New-VM -vmhost esx2.testdomain.com -Name RAC$_ -Template OL6 -Datastore datastore2 -ResourcePool TestResourcePool  
 }  
 5..6 | Foreach {  
 New-VM -vmhost esx3.testdomain.com -Name RAC$_ -Template OL6 -Datastore datastore3 | Start-VM  
 }  


As you can see we are deploying 6 VMs, named RAC1 to RAC6 from a template called OL6.
RAC1 and RAC2 will be deployed on host esx1.testdomain.com, RAC3 and RAC4 on host esx2.testdomain.com and RAC5 and RAC6 on host esx3.testdomain.com.
RAC3 and RAC4 will be placed in a resource pool called TestResourcePool.
RAC5 and RAC6 will be powered on after deployment due to Start-VM cmdlet.


To run this simple script just open VMware vSphere PowerCLI, connect to your vCenter (or host) using Connect-VIServer cmdlet as stated in VMware: vSphere PowerCLI 101 post.


A progress bar will appear in your PowerCLI console


That's all!!Happy VMware Automation!!